參考:
介紹resident memory 和 allocated memory
https://pythonspeed.com/articles/measuring-memory-python/
yolov2 詳細說明
https://senliuy.gitbook.io/advanced-deep-learning/chapter1/yolo9000-better-faster-stronger
Darknet-19與YOLOv2
目前Github上的YOLOv2已經被修改過,和論文上的描述並不一樣,必須參考最原始的cfg,而且必須要是voc的版本。
https://github.com/pjreddie/darknet/blob/c6afc7ff1499fbbe64069e1843d7929bd7ae2eaa/cfg/yolo_voc.cfg
{: .prompt-tip }
論文的第三章Faster提到Darknet-19是一個classification model,他是YOLOv2的基礎。
在Training for detection提到YOLOv2是刪掉Darknet-19的最後一個conv layers(以及他後面的其他layer),並且用3個3 x 3 x 1024 conv layer 最後搭配 1 x 1 x 類別數量的conv layer。
We modify this network for detection by removing the last convolutional layer and instead adding on three 3 × 3 convolutional layers with 1024 filters each followed by a final 1 × 1 convolutional layer with the number of outputs we need for detection.
Darknet源碼註解
region layer的biases就是anchors的值
實作Conv2dBatchLeaky
Conv
activation為linear時沒有做任何事 https://github.com/AlexeyAB/darknet/blob/0faed3e60e52f742bbef43b83f6be51dd30f373e/src/gemm.c#L2337
BatchNormal
問題:
在pytorch有momentum,在darknet有沒有?
Leaky
region layer
Pytorch實作
下面以圖片作為輸入來舉例
- CONV2D: 輸入的tensor每一個維度所對應的是$$(N,C_{in},H,W)$$
- $$N$$: 照片張數,一次一張照片為1
- $$C_{in}$$:照片channel,彩色照片為3
- $$H$$: 照片高度
- $$W$$: 照片寬度
https://kikaben.com/yolo-v2-yolo9000/
參考:
yolov2架構講解(架構圖1x1 conv的地方有錯)
https://kikaben.com/yolo-v2-yolo9000/
完整yolov2實作(高參考價值)
https://github.com/Tencent/ObjectDetection-OneStageDet
https://zhuanlan.zhihu.com/p/45039781
http://yuenshome.space/timeline/2018-11/yolov2-region-source-code/
https://github.com/tztztztztz/yolov2.pytorch
https://github.com/gwinndr/YOLOv4-Pytorch/tree/master/model/layers
https://github.com/ruiminshen/yolo2-pytorch/blob/master/model/yolo2.py
韓文Darknet介紹
https://jjeamin.github.io/darknet_book/part3_src/batchnorm_layer.html
計算layer輸出
 {: w=”700” h=”200” }
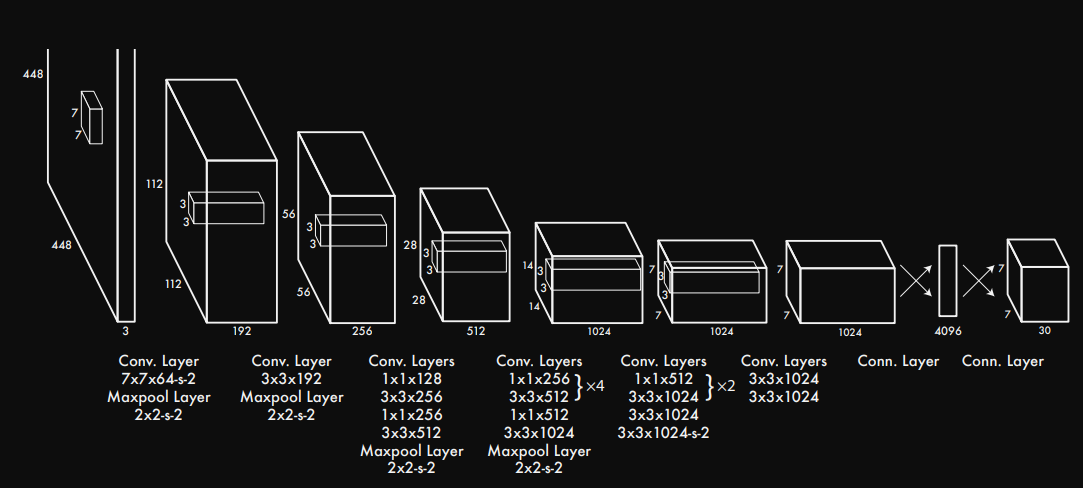
- 首先可以看到輸入的圖片是448 x 448,然後經過7 x 7 x 64 stripe 2 的conv layer,以及2 x 2 stripe 2 的Maxpool layer。
如果直接計算輸出的dimension,會發現計算有問題!!因為$${ 輸入寬度 - kernel寬度 \over stripe} \ne 224$$。查詢後發現如果去看yolov1.cfg,第一層的padding=1,也就是這層conv有paddind。
首先先看到darknet/src/parser.c的parse_convolutional可以發現if(pad) padding = size/2;,也就是如果cfg的padding=1,padding的大小就是$$\lfloor {kernel \ size \over 2} \rfloor$$ 取整數。所以第一層的padding是$$\lfloor {7 \over 2} \rfloor$$取整數3。
再去看darknet/src/convolutional_layer.c的make_convolutional_layer呼叫的convolutional_out_width,就可以看到詳細計算。conv的輸出尺寸是
$$\lfloor{ {輸入長(寬) + 2 \times padding - kernel \ 長(寬)} \over stride}\rfloor + 1 = \lfloor{447 \over 2}\rfloor + 1 = 224$$
接下來是2 x 2 Maxpool layer,輸出尺寸為112,輸出channel是
64!!不過如果直接對照圖看,會發現圖上寫112 x 112 x 192,這很可能是論文的圖寫錯了,因為如果用darknet幫你計算每一層的輸出的話應該是如下圖。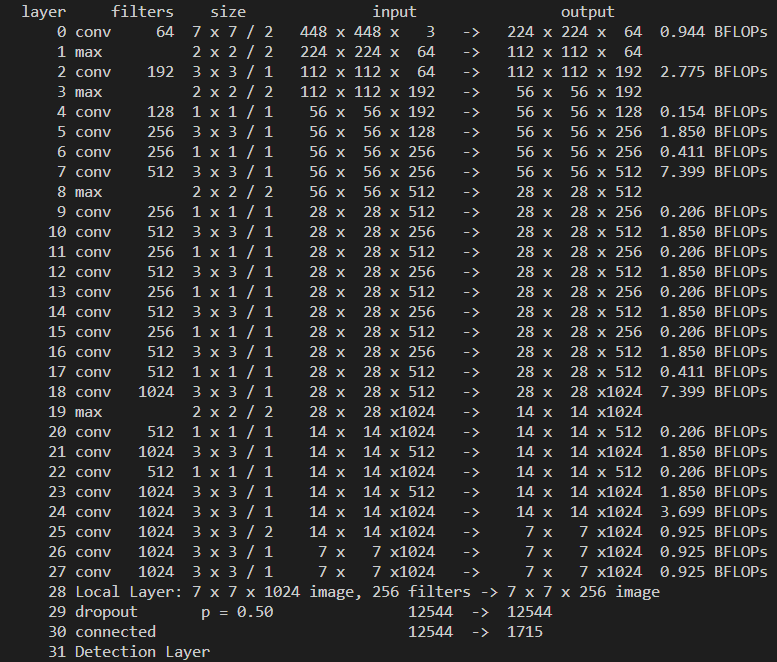 {: w=”700” h=”200” }
1 x 1 的conv稱為reduction layers
Pytorch實作
下面以圖片作為輸入來舉例
- CONV2D: 輸入的tensor每一個維度所對應的是$$(N,C_{in},H,W)$$
- $$N$$: 照片張數,一次一張照片為1
- $$C_{in}$$:照片channel,彩色照片為3
- $$H$$: 照片高度
- $$W$$: 照片寬度
darknet的conv layer程式碼疑問:
1 | for(i = 0; i < l.nweights; ++i) l.weights[i] = scale*rand_normal(); #209 |
其他紀錄
計算總共有多少個weights
layer定義
h:輸入高
w:輸入寬
c:輸入channel
n:輸出channel
size:kernel size
nweights = (c / groups) * n * size * size
darknet載入權重
src -> parser.c -> load_convolutional_weights
- 讀取biases,每一個conv的filter都有一個,如yolov1第一層有64個
- 讀取batch_normalize
- 讀取scales,數量等於輸出channel
- 讀取rolling_mean,數量等於輸出channel
- 讀取rolling_variance,數量等於輸出channel
- 讀取weights
計算weight數量
史丹佛cs231n的這張圖解釋得非常清楚,權重的總數為
輸入channel x kernel 寬 x kernel 高 x 輸出channel
local layer
參考:
Dive into Deep learning
https://d2l.ai/chapter_convolutional-neural-networks/padding-and-strides.html#stride
CS231
https://cs231n.github.io/convolutional-networks/#comp
Deep learning
http://neuralnetworksanddeeplearning.com
caculate weights number : Convolution Demo
https://cs231n.github.io/convolutional-networks/
Batch-Normalization
https://towardsdatascience.com/batch-normalization-in-3-levels-of-understanding-14c2da90a338
Locally Connected Layers說明
https://www.cs.toronto.edu/~lczhang/aps360_20191/lec/w03/convnet.html
Understanding Convolutions
http://colah.github.io/posts/2014-07-Understanding-Convolutions/
local connected layer
http://sintesis.ugto.mx/WintemplaWeb/01Neural%20Lab/09Convolutional%20NN/10Locally%20Connected/index.htm
local connected layer 實作
https://github.com/pytorch/pytorch/pull/1583/files
local connected layer 實作
https://github.com/nsoul97/yolov1_pytorch/blob/main/code/model.py
local connected layer 實作
https://github.com/pytorch/pytorch/issues/499
GDB
https://cotonne.github.io/gdb/2019/07/14/gdb-beginner-guide.html
GDB https://condor.depaul.edu/glancast/373class/docs/gdb.html
Math Syntax
https://www.rapidtables.com/math/symbols/Basic_Math_Symbols.html
GDB指令:
p sizeof(array)/sizeof(*array) ptype array 印出array長度
印出指標array的長度
p *l.biases@10 印出array的前10個元素
下載範例
下面指令將會下載本文所需的範例
1 | git clone https://gitlab.com/CLIUtils/modern-cmake.git |
CMakeLists.txt解說
- 在第29行
add_library(MyLibExample simple_lib.cpp simple_lib.hpp)增加了一個名為MyLibExample的target並且將會編譯一個MyLibExamplelibrary - 第34行增加了一個
add_executable(MyExample simple_example.cpp)增加了一個名為MyExample的target並且將會編譯一個MyExample的執行檔 - 第38行
target_link_libraries(MyExample PRIVATE MyLibExample)連接了MyLibExample和MyExample這兩個target,注意你必須先製作target才能夠連接他們
建置專案、編譯
接下來你可以用以下指令建置專案並且編譯。CMake會產生一個build資料夾,在裡面你應該會看到libMyLibExample.alibrary和MyExample執行檔。你可以查看CMakeCache.txt看有哪些cache variable,接下來用./build/MyExample執行MyExample執行檔
1 | cmake -S . -B build |
常見錯誤
路徑中有空白
1 | set(VAR a b v) |
這個寫法會讓VAR變成一個list,並且擁有a b c三個元素,因此如果你的路徑像這樣,你的路徑就會被拆成兩段。
1 | set(MY_DIR "/path/with spaces/") |
解決方法就是在${MY_DIR}外面再包一個引號
1 | set(MY_DIR "/path/with spaces/") |
除錯
印出變數
雖然message指令也可以印出變數,不過你有更好的選擇,cmake_print_properties、cmake_print_variables,記得要先include(CMakePrintHelpers)。如此一來你可以更加容易的印出target的屬性
1 | include(CMakePrintHelpers) |
–trace-source 和 –trace-expand
--trace-source讓你可以指定只要看你想看的CMakeLists.txt,--trace-expand變數全部展開,例如原本是
1 | add_library(simple_lib ${SOURCES} ${HEADERS} ) |
加了--trace-expand變成
1 | add_library(simple_lib simple_lib.c simple_lib.h ) |
下載這個範例,並且試看看cmake -S . -B build --trace-source=CMakeLists.txt 、 cmake -S . -B build --trace-source=CMakeLists.txt --trace-expand有什麼不一樣
1 | git clone git@github.com:hsf-training/hsf-training-cmake-webpage.git |
除錯CMake的find_…模組
沿用上面的範例,在這個範例你可以看到第16行有一個find_library(MATH_LIBRARY m)
1 | git clone git@github.com:hsf-training/hsf-training-cmake-webpage.git |
試看看cmake -S . -B build --debug-find。記得要先清除build資料夾否會出現debug訊息。你也可以用CMAKE_FIND_DEBUG_MODE來針對你想要debug的find_…模組來除錯
1 | set(CMAKE_FIND_DEBUG_MODE TRUE) |
設定build types
如果你想要執行C++ debugger,你會需要設定很多flag,CMake提供四種build types來幫你設定這些flag。
- CMAKE_BUILD_TYPE=Debug : 輸出所有除錯訊息
- CMAKE_BUILD_TYPE=RelWithDebInfo : release build 不過有一些額外的除錯訊息
- CMAKE_BUILD_TYPE=Release : 最佳化release build
- CMAKE_BUILD_TYPE=MinSizeRel : minimum size release
下面範例示範如何用CMake的Debug模式編譯,並且用GDB除錯GDB指令1
2
3
4cd hsf-training-cmake-webpage/code/04-debug
cmake -S . -B build-debug -DCMAKE_BUILD_TYPE=Debug
cmake --build build-debug
gdb build-debug/simple_example1
2
3
4
5# GDB
break my_sin
r
watch sign
c
尋找套件
1 | find_package(MyPackage 1.2) |
這個命令會首先尋找CMAKE_MODULE_PATH這份路徑清單,在這些路徑底下尋找FindMyPackage.cmake這個檔案,注意他是直接把find_package第一個參數MyPackage產生出FindMyPackage.cmake這個搜尋目標,所以如果我們寫成find_package(OpenCV 3),那搜尋目標就是FindOpenCV.cmake。
如果找不到FindMyPackage.cmake他就會接著尋找MyPackageConfig.cmake,如果MyPackage_DIR存在的話也會搜尋這個路徑。
在CMake3.12+之後,如果你的套件不是安裝在系統預設路徑,你可以設定環境變數<PackageName>_ROOT讓CMake搜尋。以下以Bash命令設定環境變數為例
1 | export HDF5_ROOT=$HOME/software/hdf5-1.12.0 |
或者是設定CMAKE環境變數,以下以Bash命令設定環境變數為例
1 | export CMAKE_PREFIX_PATH=$HOME/software/hdf5-1.12.0:$HOME/software/boost-1.74.0:$CMAKE_PREFIX_PATH |
FindPackage.cmake
這是舊方法(MODULE方法),這裡有CMake提供的FindPackage清單
PackageConfig
這是由package開發者所提供,簡而言之如果你是package開發者,你應該提供<package>Config.cmake並且自行維護。
CMake結合PkgConfig
參考:
https://hsf-training.github.io/hsf-training-cmake-webpage/08-debugging/index.html
https://hsf-training.github.io/hsf-training-cmake-webpage/09-findingpackages/index.html
現代CMake觀念
https://pabloariasal.github.io/2018/02/19/its-time-to-do-cmake-right/
CMake結合PkgConfig
https://stackoverflow.com/a/74038236
在第一篇我們已經學會如何編譯單一檔案的C++程式,接下來將介紹一些CMake的觀念
關於Targets
在CMake有兩種方式建立target,target的名稱必須是唯一的
- add_executable(myexample simple.cpp) : 建立了一個名為myexample的
target,並且命名輸出的執行檔為myexample - add_library(mylibrary simplelib.cpp) : 建立了一個名為myexample的
target,並且命名輸出的函式庫為myexampletarget很像程式裡面物件的概念,他擁有許多屬性,例如SOURCES在這個範例他會擁有simple.cpp這個檔案,target所有的屬性可以在這裡查到
特別的targets
有些C++函式庫只有標頭檔(例如函式庫Eigen),這種情況下你沒辦法真正的輸出一個library檔,但是他又被製作成target讓其他target使用。這種函式庫我們叫做interface libraries而再CMake我們可以用下面指令把他製作成target。注意到跟前面不同的是他只需要設為INTERFACE屬性而且他不需要輸入*.cpp檔。
1 | add_library(some_header_only_lib INTERFACE) |
另一種狀況是你要直接使用預先編譯好的pre-built library,這種情況你也不會有*.cpp可以給CMake編譯。這種library在CMake裡我們稱為imported library,我們可以用關鍵字IMPORTED來告訴CMake。
1 | add_library(some_library STATIC IMPORTED) |
連接
一旦你有了target就可以用target_link_libraries連接所需要的東西,連接的時候有PUBLIC, PRIVATE, 和 INTERFACE三種屬性可以選擇,他有點像程式語言中的存取控制。如果TargetB引用TargetA,則TargetA的PUBLIC屬性都會傳遞給TargetB。
範例1: Include directories
target_include_directories(TargetA PRIVATE mydir)連接TargetA和mydir資料夾屬性為PRIVATE,這時候TargetA的INCLUDE_DIRECTORIES屬性就會包含mydir資料夾target_include_directories(TargetA INTERFACE mydir)連接TargetA和mydir資料夾屬性為INTERFACE,這時候TargetA的INTERFACE_INCLUDE_DIRECTORIES屬性就會包含mydir資料夾target_include_directories(TargetA PUBLIC mydir)連接TargetA和mydir資料夾屬性為PUBLIC,則INCLUDE_DIRECTORIESINTERFACE_INCLUDE_DIRECTORIES都會包含mydir資料夾
CMake變數
為了方便起見,接下來的範例會直接執行example.cmake檔,而不是建立一個CMakeLists.txt。首先你需要先建立一個example.cmake,如果要執行example.cmake可以利用CMake的 -p 選項。這樣可以節省去許多編譯設定,也比較容易實驗
1 | # Assuming you have a file called example.cmake: |
Local variables
在example.cmake輸入以下指令,然後執行cmake -P example.cmake就可以看到終端機輸出你的變數。在這裡set指令設定變數,message指令印出變數,這裡我們使用的是STATUSmessage,還有其他的狀態你可以到官網查看
1 | set(MY_VARIABLE "I am a variable") |
{: file=’example.cmake’}
Cached variables
cached variables在CMake十分重要,通常我們會用CMake圖形介面或是CMake命令介面設定許多cached variables,這些變數都會被寫到CMakeCache.txt檔案裡面。當你執行CMake的時候CMake會先讀取這些Cached variables。下面這個範例會設定一個Cached variables,不過因為我們用-P執行*.cmake,所以不會真的輸出一個CMakeCache.txt,你可以參考上一篇的範例觀察CMake如何產生CMakeCache.txt。
1 | set(MY_VARIABLE "I am a variable") |
{: file=’example.cmake’}
而因為Cached variables幾乎都是可以讓使用者設定的選項,所以有一個更方便的指令option
1 | option(MY_OPTION "On or off" OFF) |
Other variables
- 你可以藉由
$ENV{my_env}來取得環境變數my_env的值,你也可以利用if(DEFINED ENV{my_env})來檢查my_env這個環境變數是不是有被設定(注意這個指令沒有$) target的屬性其實也是一種變數,你可以利用get_property和set_property,或者是get_target_properties和set_target_properties來查看和設定target屬性,除此之外還有CMake本身的屬性,可以從cmake-properties這份清單查詢。
Target properties and variables
你已經知道target的屬性可以控制target的行為,如果你仔細觀察會發現,有許多target屬性(例如CXX_EXTENSIONS)會有一個對應的CMake變數,並且以CMAKE_為開頭(例如CMAKE_CXX_EXTENSIONS),這些CMake變數是用來初始化對應的target屬性用的。因此你可以先設定這些CMake變數,這樣就可以快速設定target對應屬性的初始值。
搜尋工具
CMake有一些方便的glob指令可以用來處理string。
1 | file(GLOB OUTPUT_VAR *.cxx) |
在這裡要提到一個很重要的flagCONFIGURE_DEPENDS(CMake 3.12+),如果沒有這個flag則在重新執行建置的時候,cmake不會再次用glob去搜尋,如此一來如果這些被搜尋的資料夾放入的新的檔案也不會被CMake發現。因此如果你想要在每一次建置專案的時候都重新搜尋,記得加上這個flag
1 | file(GLOB OUTPUT_VAR *.cxx CONFIGURE_DEPENDS) |
參考:
CMake Fundamentals Part 4
https://jeremimucha.com/2021/02/cmake-fundamentals-part4/
Modern CMake is like inheritance
https://kubasejdak.com/modern-cmake-is-like-inheritance
CMake doc : Importing Libraries
https://cmake.org/cmake/help/latest/guide/importing-exporting/index.html#importing-libraries
https://cliutils.gitlab.io/modern-cmake/chapters/basics.html
https://hsf-training.github.io/hsf-training-cmake-webpage/04-targets/index.html
https://hsf-training.github.io/hsf-training-cmake-webpage/05-variables/index.html
安裝
Ubuntu22.04安裝Vagrant
1 | wget -O- https://apt.releases.hashicorp.com/gpg | gpg --dearmor | sudo tee /usr/share/keyrings/hashicorp-archive-keyring.gpg |
安裝VirtualBox
在/etc/apt/sources.list最下面加上這一行
1 | deb [arch=amd64 signed-by=/usr/share/keyrings/oracle-virtualbox-2016.gpg] https://download.virtualbox.org/virtualbox/debian jammy contrib |
然後下載和註冊public key
1 | wget -O- https://www.virtualbox.org/download/oracle_vbox_2016.asc | sudo gpg --dearmor --yes --output /usr/share/keyrings/oracle-virtualbox-2016.gpg |
顯示fingerprint,應該要為B9F8 D658 297A F3EF C18D 5CDF A2F6 83C5 2980 AECF
1 | gpg --show-keys --with-fingerprint /usr/share/keyrings/oracle-virtualbox-2016.gpg |
最後安裝
1 | sudo apt-get update |
建立一個Ubuntu20.04 box
1 | vagrant init ubuntu/focal64 |
x11 forwarding
共享資料夾
https://developer.hashicorp.com/vagrant/tutorials/getting-started/getting-started-synced-folders
參考:
安裝VirtualBox
https://www.virtualbox.org/wiki/Linux_Downloads
顯示gpg fingerprint
https://superuser.com/a/1747762
我的部落格文章轉錄–Linux環境撰寫Shared Library有詳細介紹如何製作和安裝Shared Library,如果想要了解更多Shared Library安裝和製作方式可以參考這篇。
{: .prompt-tip }
在這篇我們想直接使用OpenCV預編譯的函式庫,省去自己編譯函式庫的時間,首先我們先到官網提到的Third-party packages的System packages in popular Linux distributions,找到自己的Linux distributions,在這裡我們是使用Ubuntu22,而我們要下載的是development files for opencv也就是libopencv-dev_4.5.4+dfsg-9ubuntu4_amd64.deb這個連結,在Install Howto的地方可以看到安裝指令。
如果你不想弄亂你的環境,建議你可以用Vagrant建立一台測試環境來測試一下安裝後的結果,或是做一些實驗。
安裝Vagrant的方法在安裝vagrant製作測試環境
{: .prompt-tip }
1 | sudo apt-get update |
在Files的地方可以看到他幫我們裝了什麼東西以及他們被安裝的位置。在Requires的地方可以看到他還幫我們安裝了哪些相依套件。
在這裡我們比較一下libopencv-core-dev和libopencv-core4.5d這兩個函式庫。在這兩個package的Files的地方可以發現libopencv-core-dev幫我們在/usr/include/opencv4多裝了很多標頭檔(*.hpp),因為如果要在我們自己的C++中使用OpenCV,必須要include OpenCV的標頭檔,而dev套件已經幫我們幫把標頭檔都放在/usr/include/opencv4讓我們可以引用了。而在編寫OpenCV的C++專案的時候,要記得把這個include資料夾放到你的專案裡。
pkg-config幫我們列出全部的標頭檔位置和opencv的名稱
標頭檔路徑只需要加上g++選項-I/usr/include/opencv4就可以了,不過如果要把所有用到的library都手動寫出來實在很麻煩,這時候pkg-config可以幫我們把全部的opencv library全部列出來,我們可以試看看在終端機輸入下面指令pkg-config --libs --cflags opencv4(如果安裝的是opencv 2.x或3.x要輸入pkg-config --libs --cflags opencv),終端機的回應應該會長的像下面這樣。
1 | $ pkg-config --libs --cflags opencv4 |
g++的指令是長這樣
1 | /usr/bin/g++ -g main.cpp -o main `pkg-config --libs --cflags opencv4` |
你可以到linux下設定vscode-cmake-gcc-gdb來開發c-專案查看如何用VSCode連接和編譯OpenCV library。
參考:
https://blog.gtwang.org/programming/ubuntu-linux-install-opencv-cpp-python-hello-world-tutorial/
https://pkgs.org/search/?q=opencv
https://ubuntu.pkgs.org/22.04/ubuntu-universe-amd64/libopencv-dev_4.5.4+dfsg-9ubuntu4_amd64.deb.html
撰寫範例程式
1 | bool isPalindrome(char* word); |
{: file=”pal.h” }
1 |
|
{: file=”pal.cpp” }
編譯shared library
在終端機輸入以下GCC指令,注意這裡我們有-c選項,這告訴GCC不要進行linking stage,如果沒加GCC就會報錯,因為一個應用程式一定會有main()函式,但是Library不需要main()函式。這行指令將會產生一個pal.o檔
1 | g++ -fPIC -c -Wall pal.cpp |
接下來我們要用pal.o檔和以下指令產生真正的library。ld是linker program,通常會被g++呼叫。-shared告訴ld製作一個shared object,以pal.o為輸入輸出名為libpal.so。在Linux通常shared libraries的副檔名都是.so。
1 | ld -shared pal.o -o libpal.so |
使用shared library
首先建立一個main.cpp來呼叫我們的library的isPalindrome函式。在程式中我們include函式庫的標頭檔pal.h
1 |
|
{: file=”main.cpp” }
接下來我們可能直接用g++ -Wall main.cpp -lpal這行指令連接我們的shared library,c但是如果這麼做我們會得到下面錯誤訊息。這是因為ld在預設的搜尋路徑下找不到libpal.so
1 | /usr/bin/ld: cannot find -lpal: No such file or directory |
其中一種解法是用g++告入ld函式庫的位置
1 | g++ -Wall -L<libpal.so的路徑> -Wl,-rpath=<libpal.so的路徑> main.cpp -lpal |
例如
1 | g++ -Wall -L/home/faye -Wl,-rpath=/home/faye/ main.cpp -lpal |
其中:
-Wall是用來檢查所有編譯警告的L式shared library的路徑,讓ld知道要去那裡尋找-Wl是一連串用逗號分隔的linker指令,在這裡有-rpath表示library 的路徑會被嵌入到主程式的執行檔,因此loader在執行主程式的時候可以找到library
-L與-rpath的區別是:
-L是給linker用的-rpath是被嵌入到執行檔給loader看的
最後g++會幫我們產生a.out執行檔,執行方式和結果如下
1 | $ ./a.out |
安裝自己開發的Shared Libraries
用剛剛的方式連接Shared Libraries的方法有個缺點,也就是你的編譯指令直接給其他人的話可能會出錯,因為Shared Libraries在每個人的電腦上的位置可能都不一樣。因此rpath和-L選項的路徑也會不一樣。而我們的解決方法之一就是LD_LIBRARY_PATH
LD_LIBRARY_PATH
如果我們直接在終端機輸入指令echo $LD_LIBRARY_PATH看LD_LIBRARY_PATH的值,他應該會是空的,除非你以前曾經設定過他。要是用LD_LIBRARY_PATH我們只需要以下指令
1 | export LD_LIBRARY_PATH=<Shared Library所在資料夾>:$LD_LIBRARY_PATH |
例如
1 | export LD_LIBRARY_PATH=/home/faye:$LD_LIBRARY_PATH |
這時在輸入一次echo $LD_LIBRARY_PATH應該就會輸出/home/faye:。而這時候我們編譯main.cpp的時候就算沒有-rpath選項編譯出來的執行檔也不會找不到libpal.so
1 | g++ -Wall -L/home/faye/sotest main.cpp -lpal |
你可以先嘗試看看在還沒設定
LD_LIBRARY_PATH之前或是利用unset LD_LIBRARY_PATH指令清空LD_LIBRARY_PATH變數,所編譯出來的執行檔會出現什麼問題。
你應該會發現編譯的過程沒有任何錯誤訊息,但是一旦你執行編譯出來的執行檔a.out就會跳出錯誤訊息./a.out: error while loading shared libraries: libpal.so: cannot open shared object file: No such file or directory,這表示執行檔loader找不到libpal.so檔
{: .prompt-tip }
不過LD_LIBRARY_PATH其實只適合在開發階段拿來測試library用,因為它不需要root權限,但是函式庫發布給大家使用的時候,要求每個人都去設定LD_LIBRARY_PATH並不是個好方法。
ldconfig : 安裝Shared Libraries正統方法
首先我們先清除上一個教學的LD_LIBRARY_PATH設定,可以用unset LD_LIBRARY_PATH指令來清除。
接下來我們必須把我們的函式庫複製到/usr/lib資料夾。複製函式庫到/usr/lib必須擁有root權限,因此我們用sudo來幫助我們。
1 | sudo mv <函式庫所在資料夾>/libpal.so /usr/lib |
例如
1 | sudo mv /home/faye/libpal.so /usr/lib |
接下來更新系統中儲存可用libraries的cache。
1 | sudo ldconfig |
你可以用下面指令來確定cache已經被更新了而且系統可以找到你的函式庫
1 | ldconfig -p | grep libpal |
系統應該會回應你
1 | libpal.so (libc6,x86-64) => /lib/libpal.so |
接下來你就可以用下面指令編譯我們的執行檔了,而且這次我們不需要-rpath,也不需要-L選項!!因為現在我們的函式庫已經位於系統預設的函式庫搜尋路徑下了。
1 | g++ -Wall main.cpp -lpal |
參考:
https://www.fayewilliams.com/2015/07/07/creating-a-shared-library/
https://www.fayewilliams.com/2015/07/14/installing-and-accessing-shared-libraries/
Linux下設定VScode、CMake、GCC、GDB來開發C++專案
安裝套件
cmake extension
c++ extension
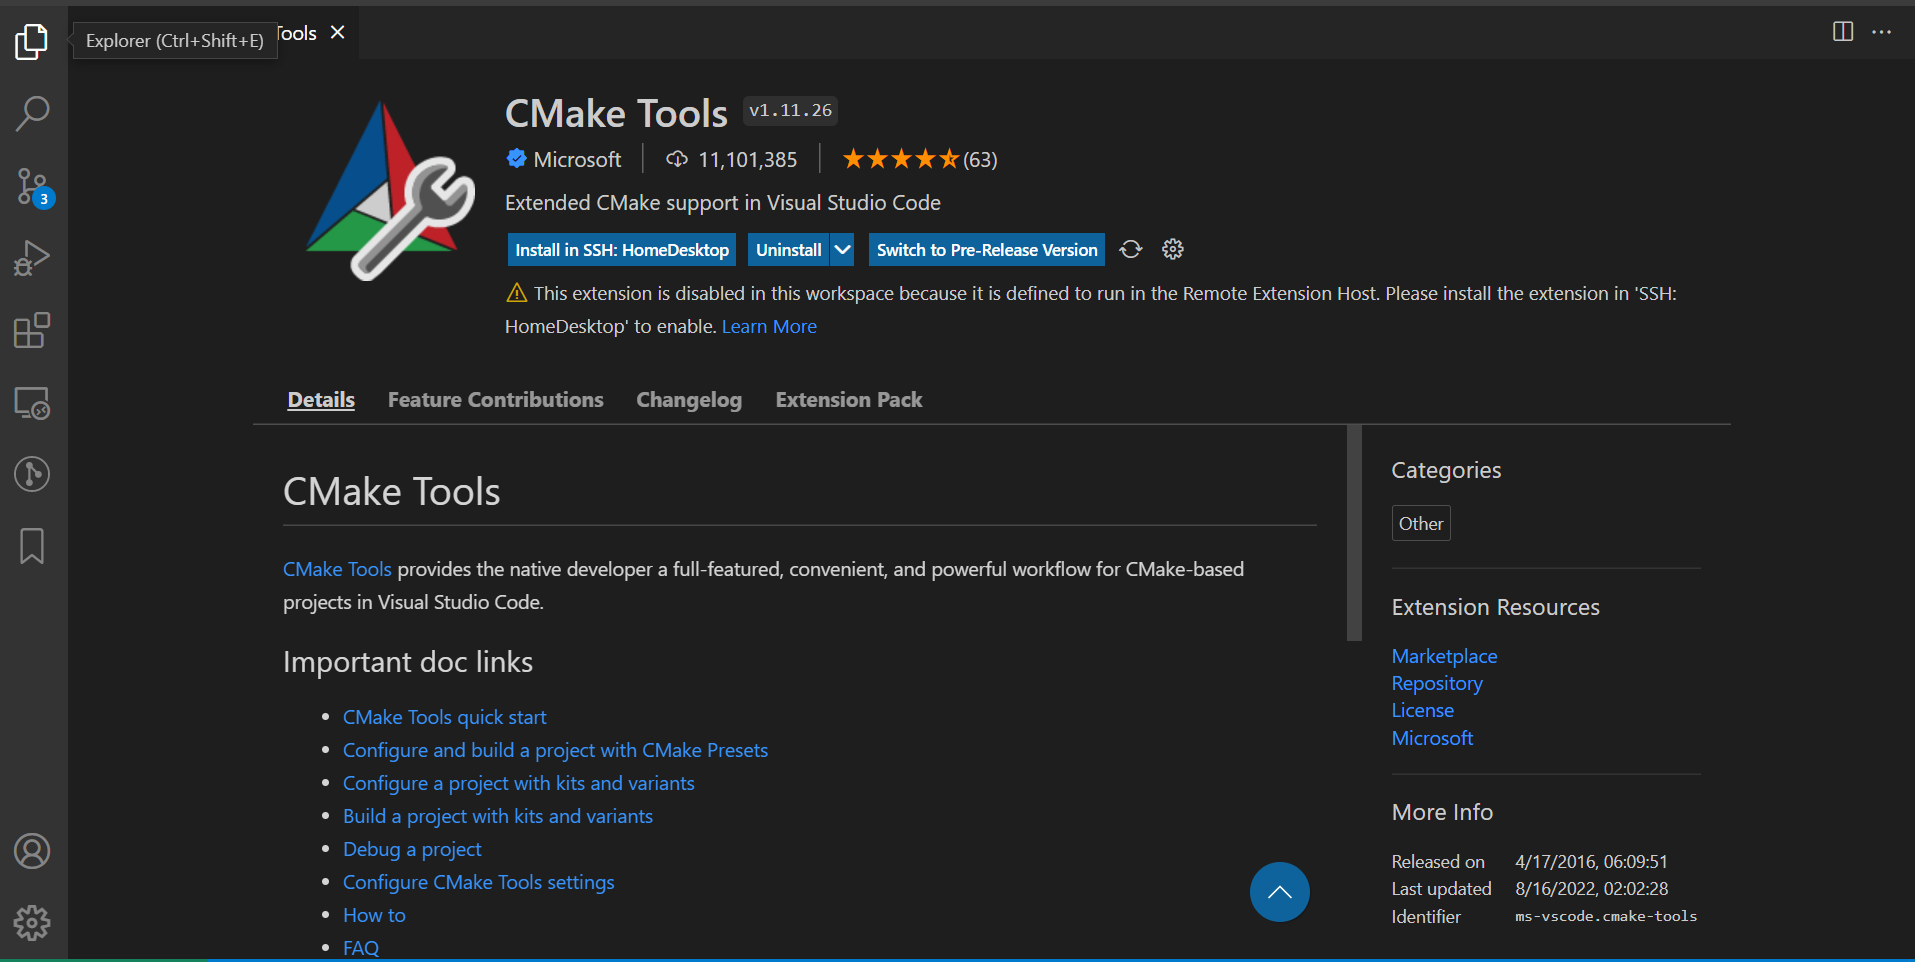 {: w=”700” h=”400” }
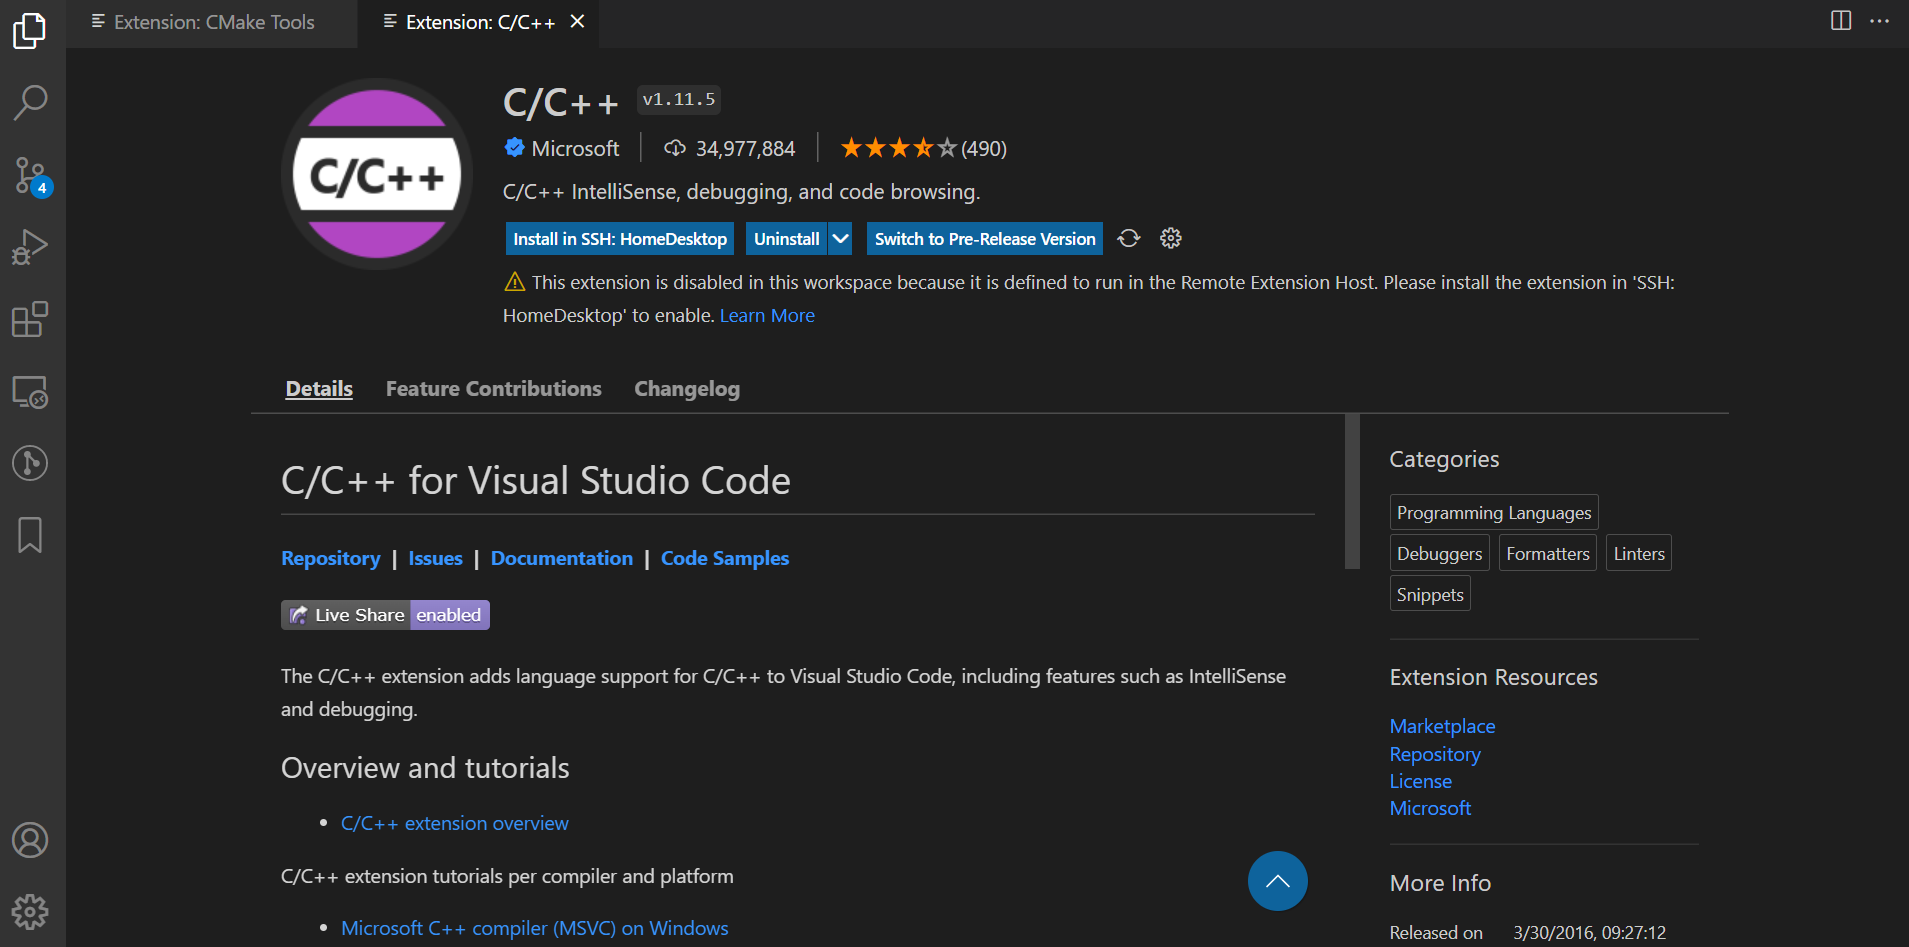 {: w=”700” h=”400” }
安裝編譯器GCC、除錯器DBG
1
2
3sudo apt-get update
sudo apt-get install build-essential gdb
gcc -v #確認GCC安裝成功
注意:
GDB 12.09 版本在VSCode除錯的時候會有錯誤,可以參考下面方式將GDB升級到12.10以上版本
升級GDB
GDB issue
{: .prompt-warning }
- 安裝CMake
直接用sudo apt install cmake,安裝的版本會比較舊,因此如果想用CMake最新的功能可以按照官方網站的安裝方式,安裝後我們可以測試一下CMake安裝成功,在這裡我們CMake的版本至少要大於3.151
cmake --version
編譯C++檔
用以下指令建立一個專案資料夾,最後一行code .會直接打開一個新的VScode並且以這個資料夾作為工作目錄
1 | mkdir projects |
在helloworld資料夾建立helloworld.cpp檔案並且寫入以下程式碼,然後按下編譯按鈕,並且選擇g++作為編譯器(如下圖所示)
1 |
|
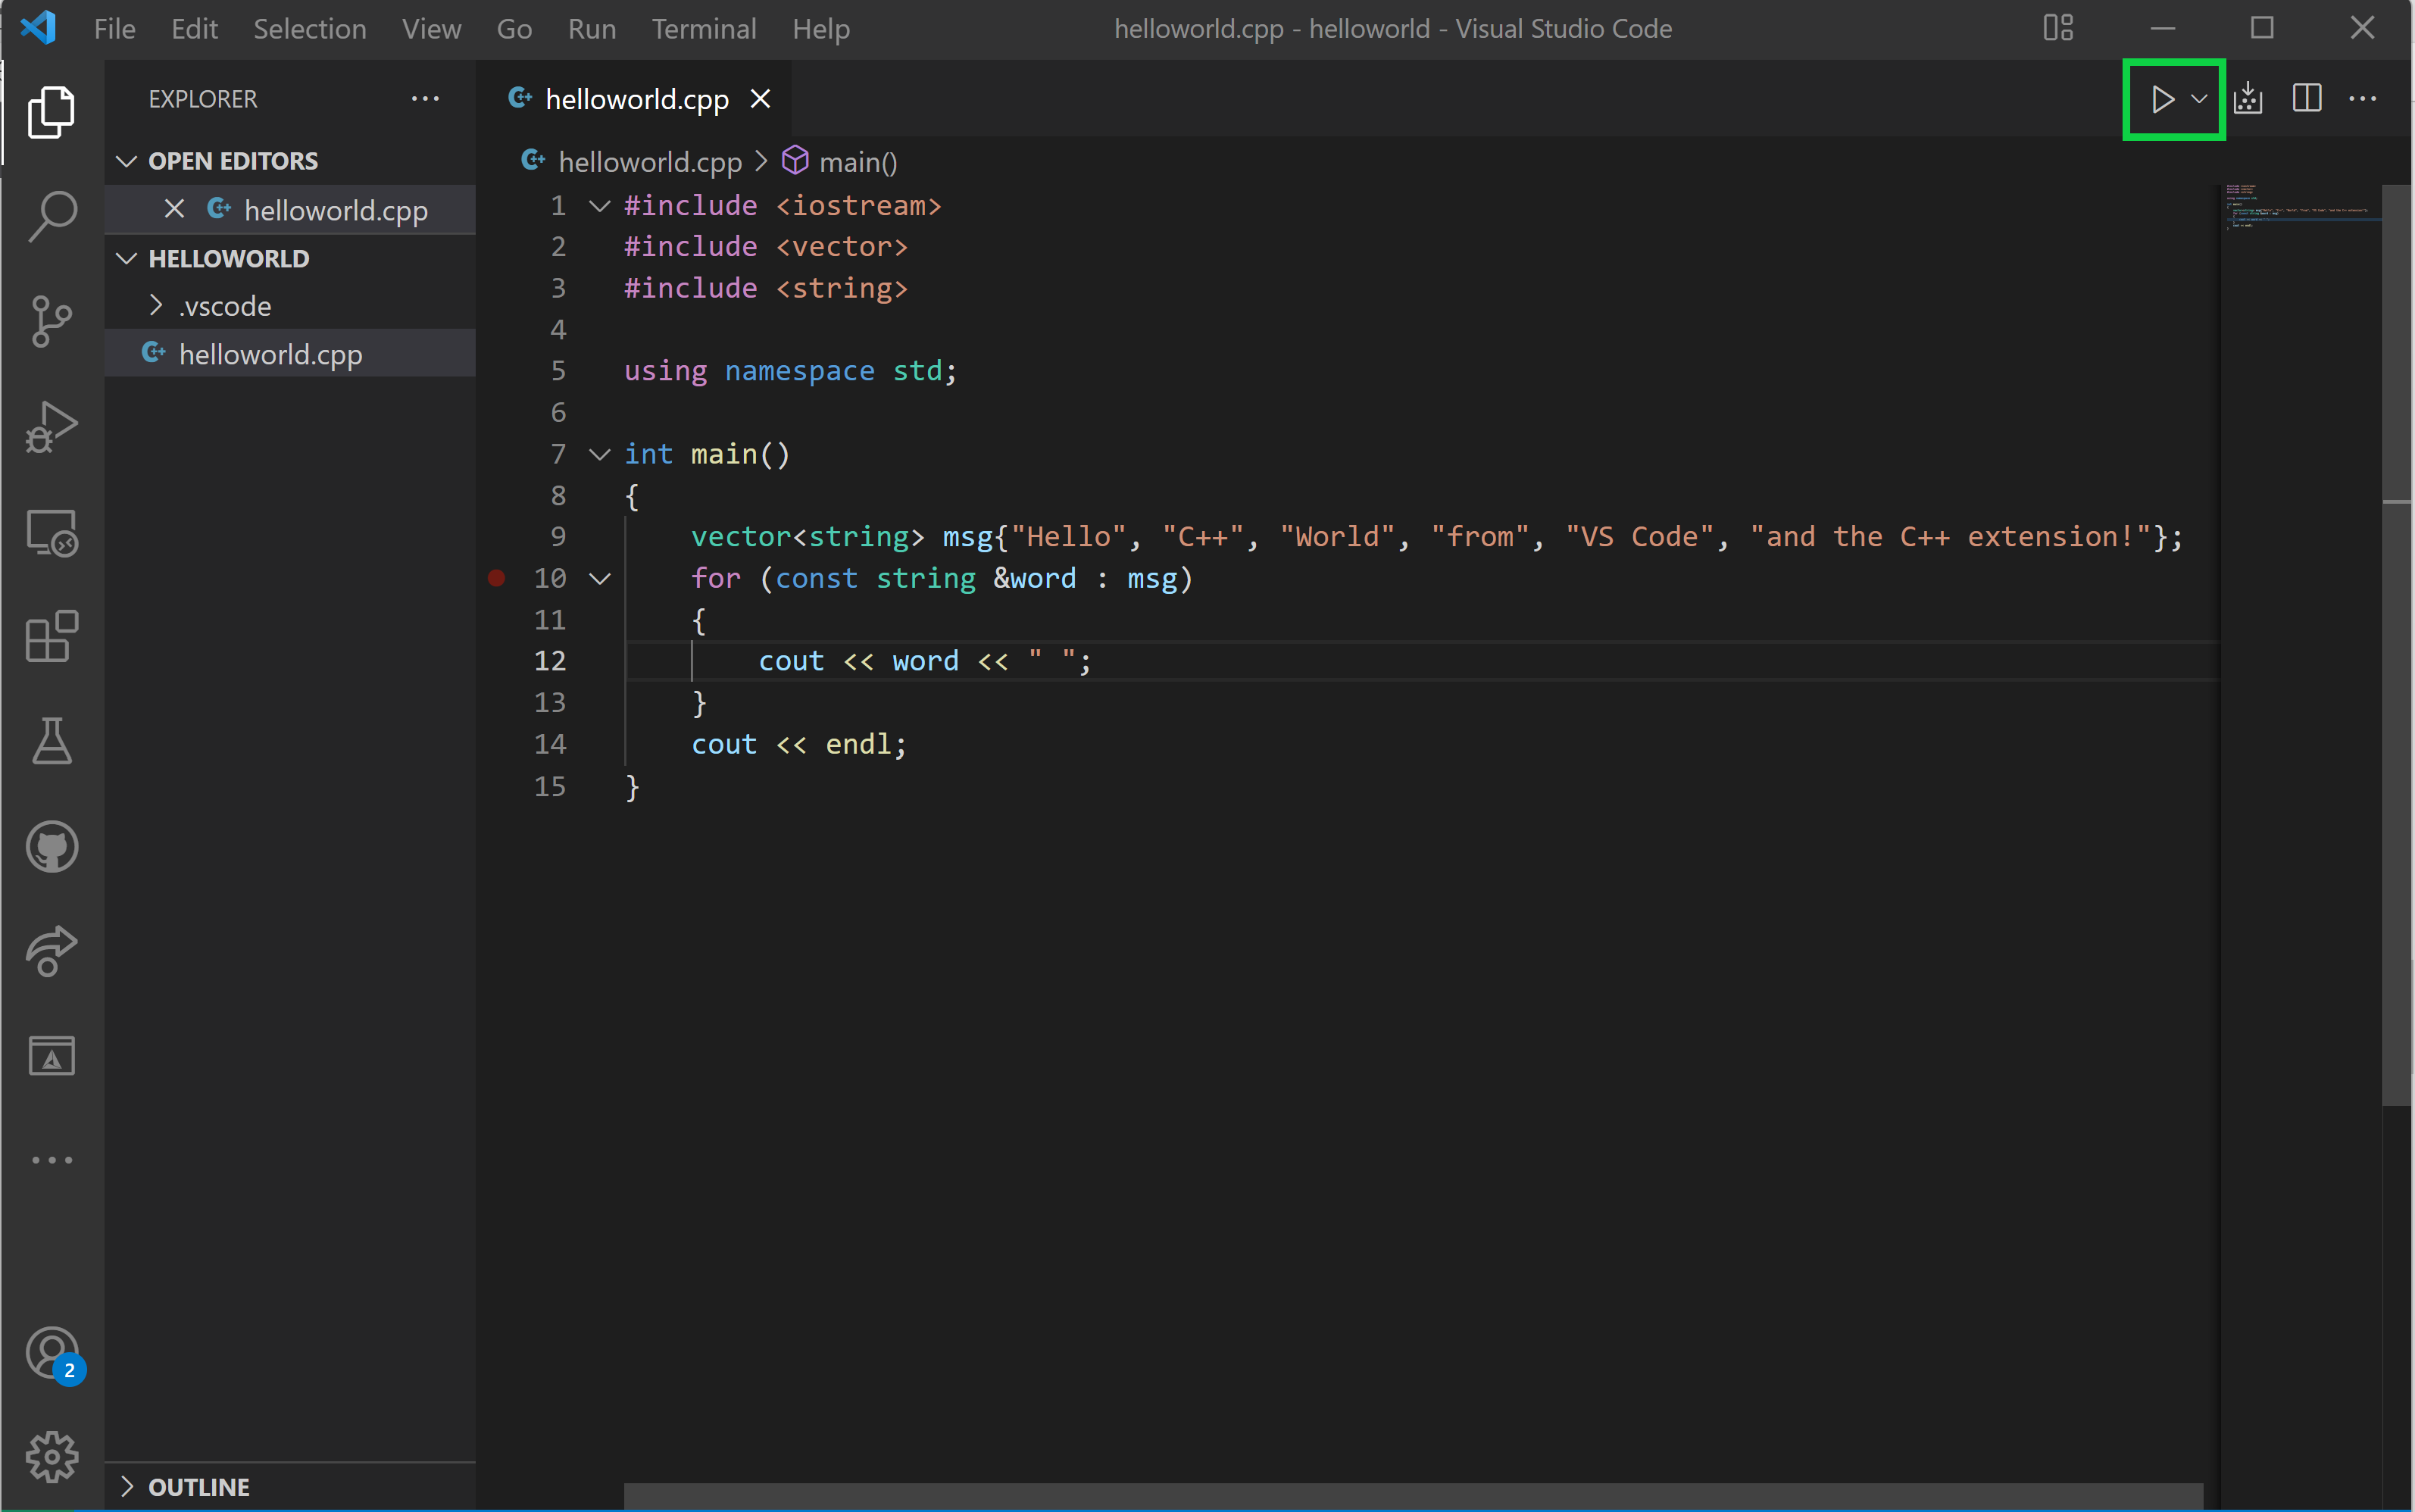 {: w=”700” h=”400” }
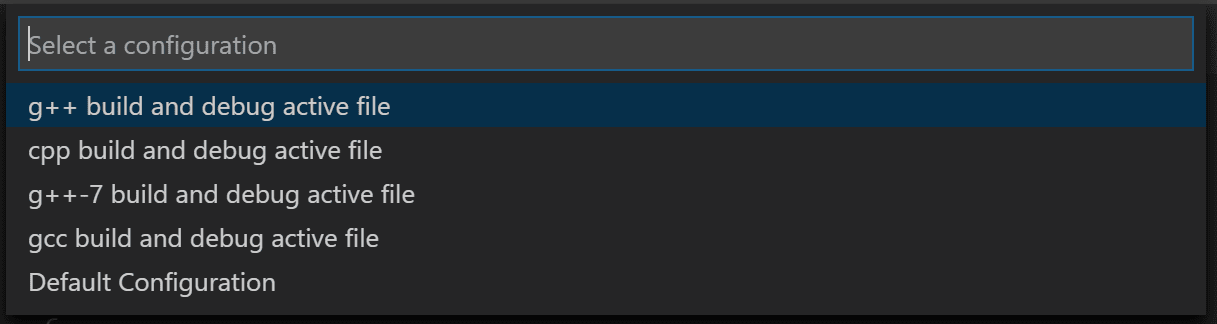 {: w=”700” h=”400” }
成功編譯後,你會在Terminal看到程式成功輸出文字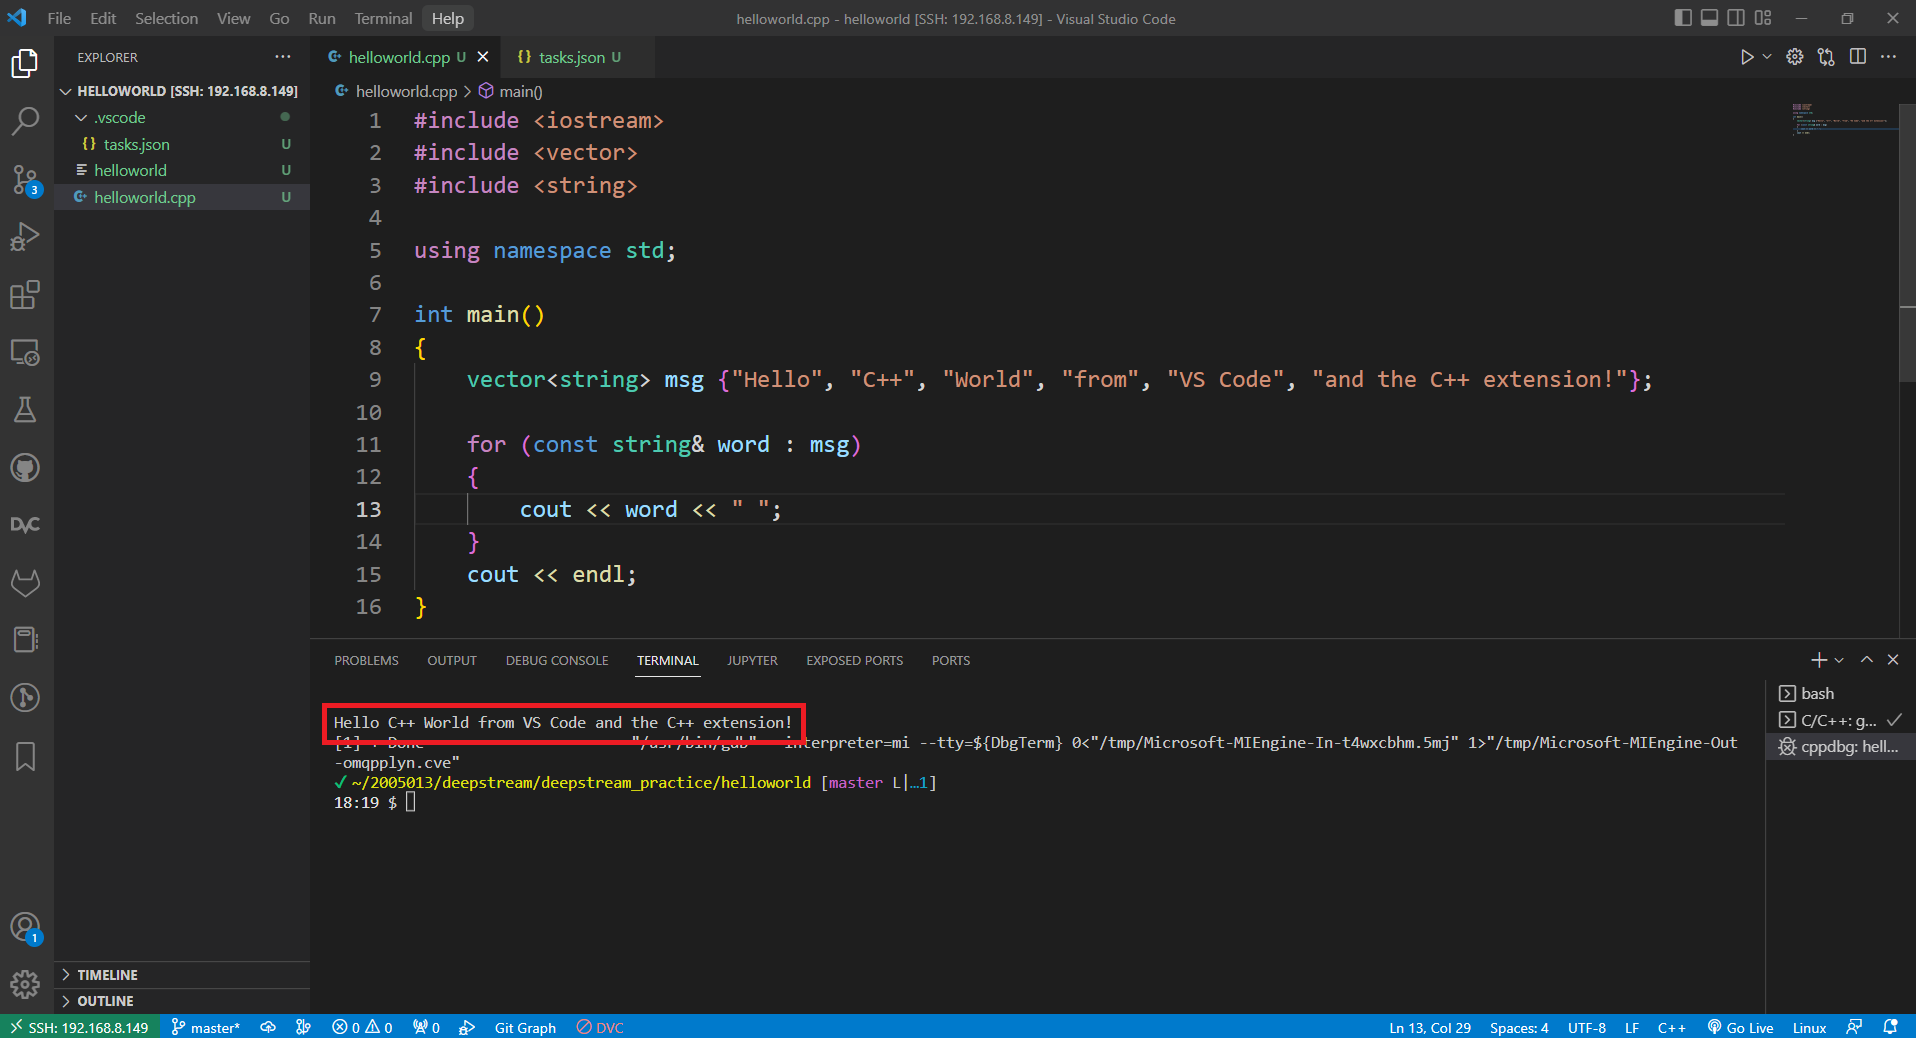 {: w=”700” h=”400” }
第一次按下執行compiler後,VScode會幫你建立一個.vscode資料夾和一個,tasks.json。或是你可以自己建立一個.vscode資料夾並且放入tasks.json。
1 | { |
{: file=’tasks.json’}
在這個資料夾下可以有三種檔案,每個檔案各有自己的用處,關於tasks.json詳細設定可以參考這裡
- tasks.json (compiler build settings)
- launch.json (debugger settings)
- c_cpp_properties.json (compiler path and IntelliSense settings)
在tasks.json裡面有幾個的比較重要的點
args是給GCC的參數,要符合GCC參數的順序- 在這裡我們用
${file}這個變數告訴GCC目前打開的檔案讓他編譯 ${fileDirname}這個變數告訴GCC目前的資料夾位置,讓他在這個位置產生我們的執行檔${fileBasenameNoExtension}變數取出目前開啟的檔名但是不包含副檔名,我們用這個名字作為我們的執行檔名,也就是helloworldlabel會顯示在task清單detail會顯示在task清單的詳細描述。先按下Ctrl+P並且輸入task(task後面有空白),就會顯示task清單,包含我們建立的task(如下圖所示)- 如果有多個task,可以利用
group裡面isDefault屬性設定預設task
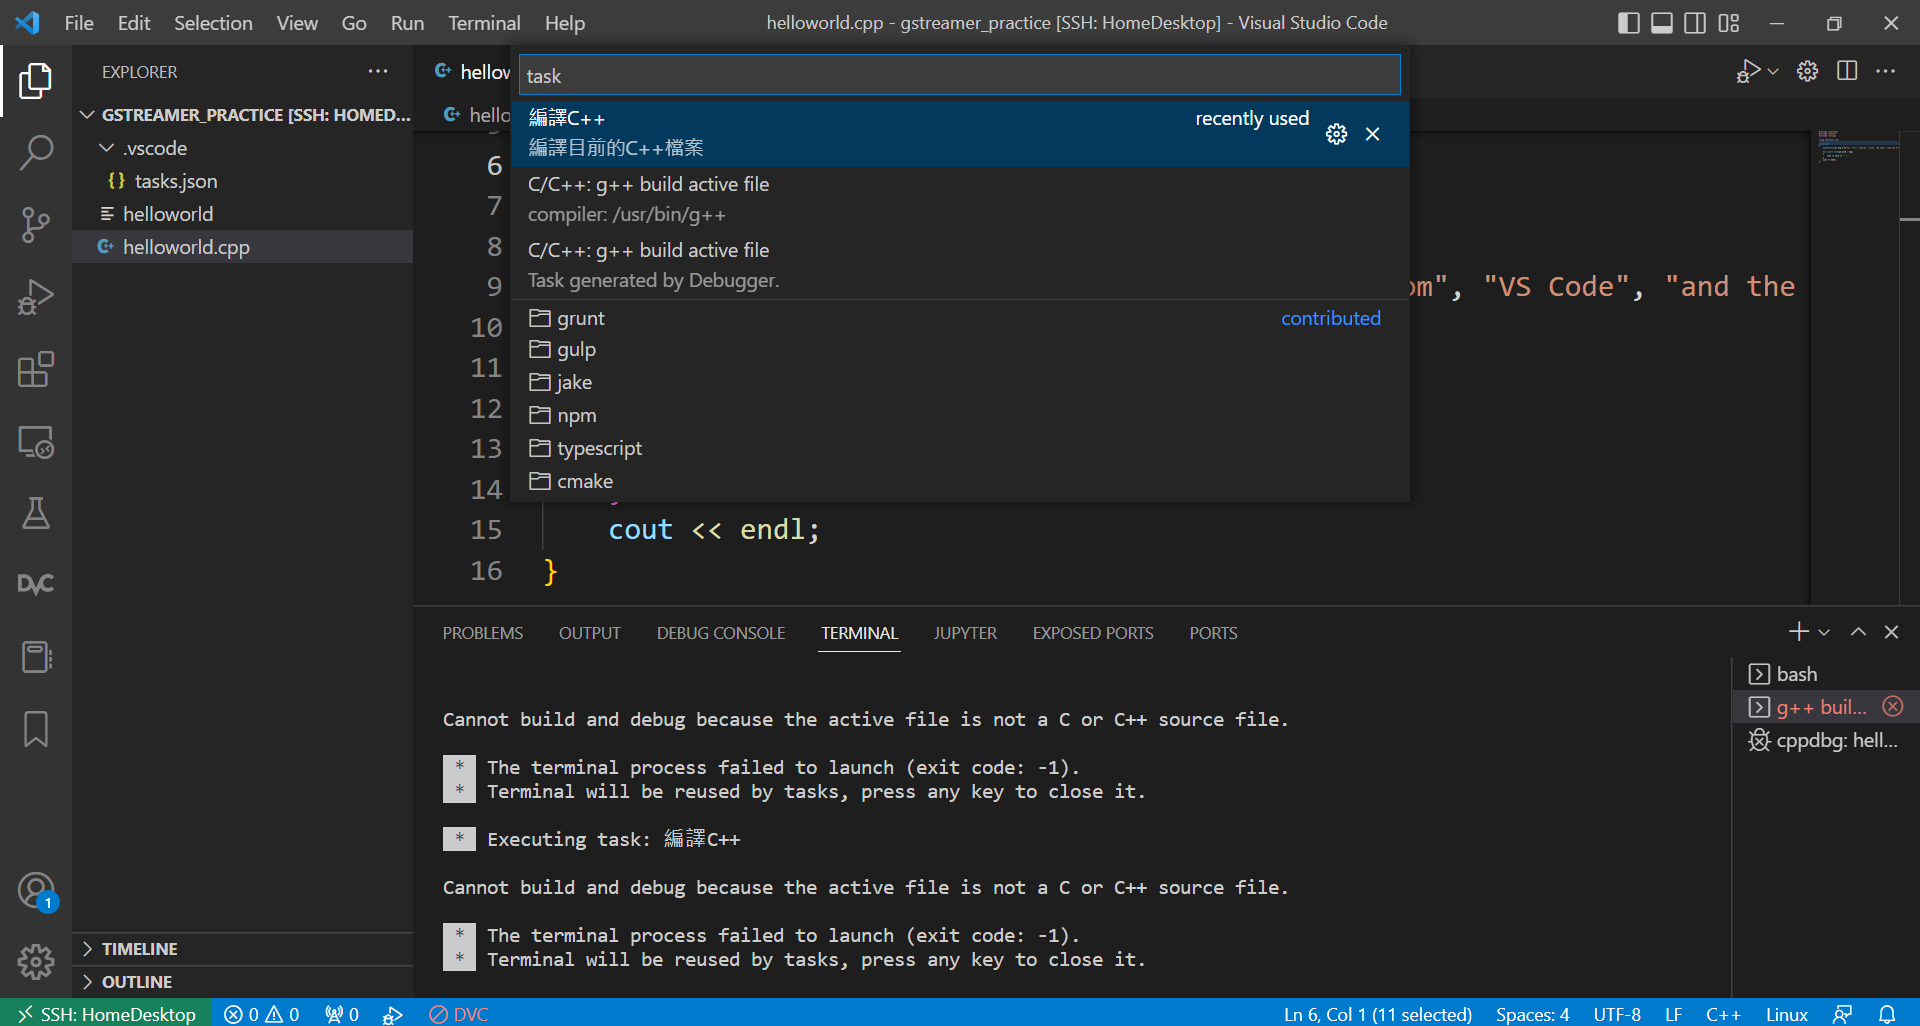 {: w=”700” h=”400” }
除錯、設中斷點
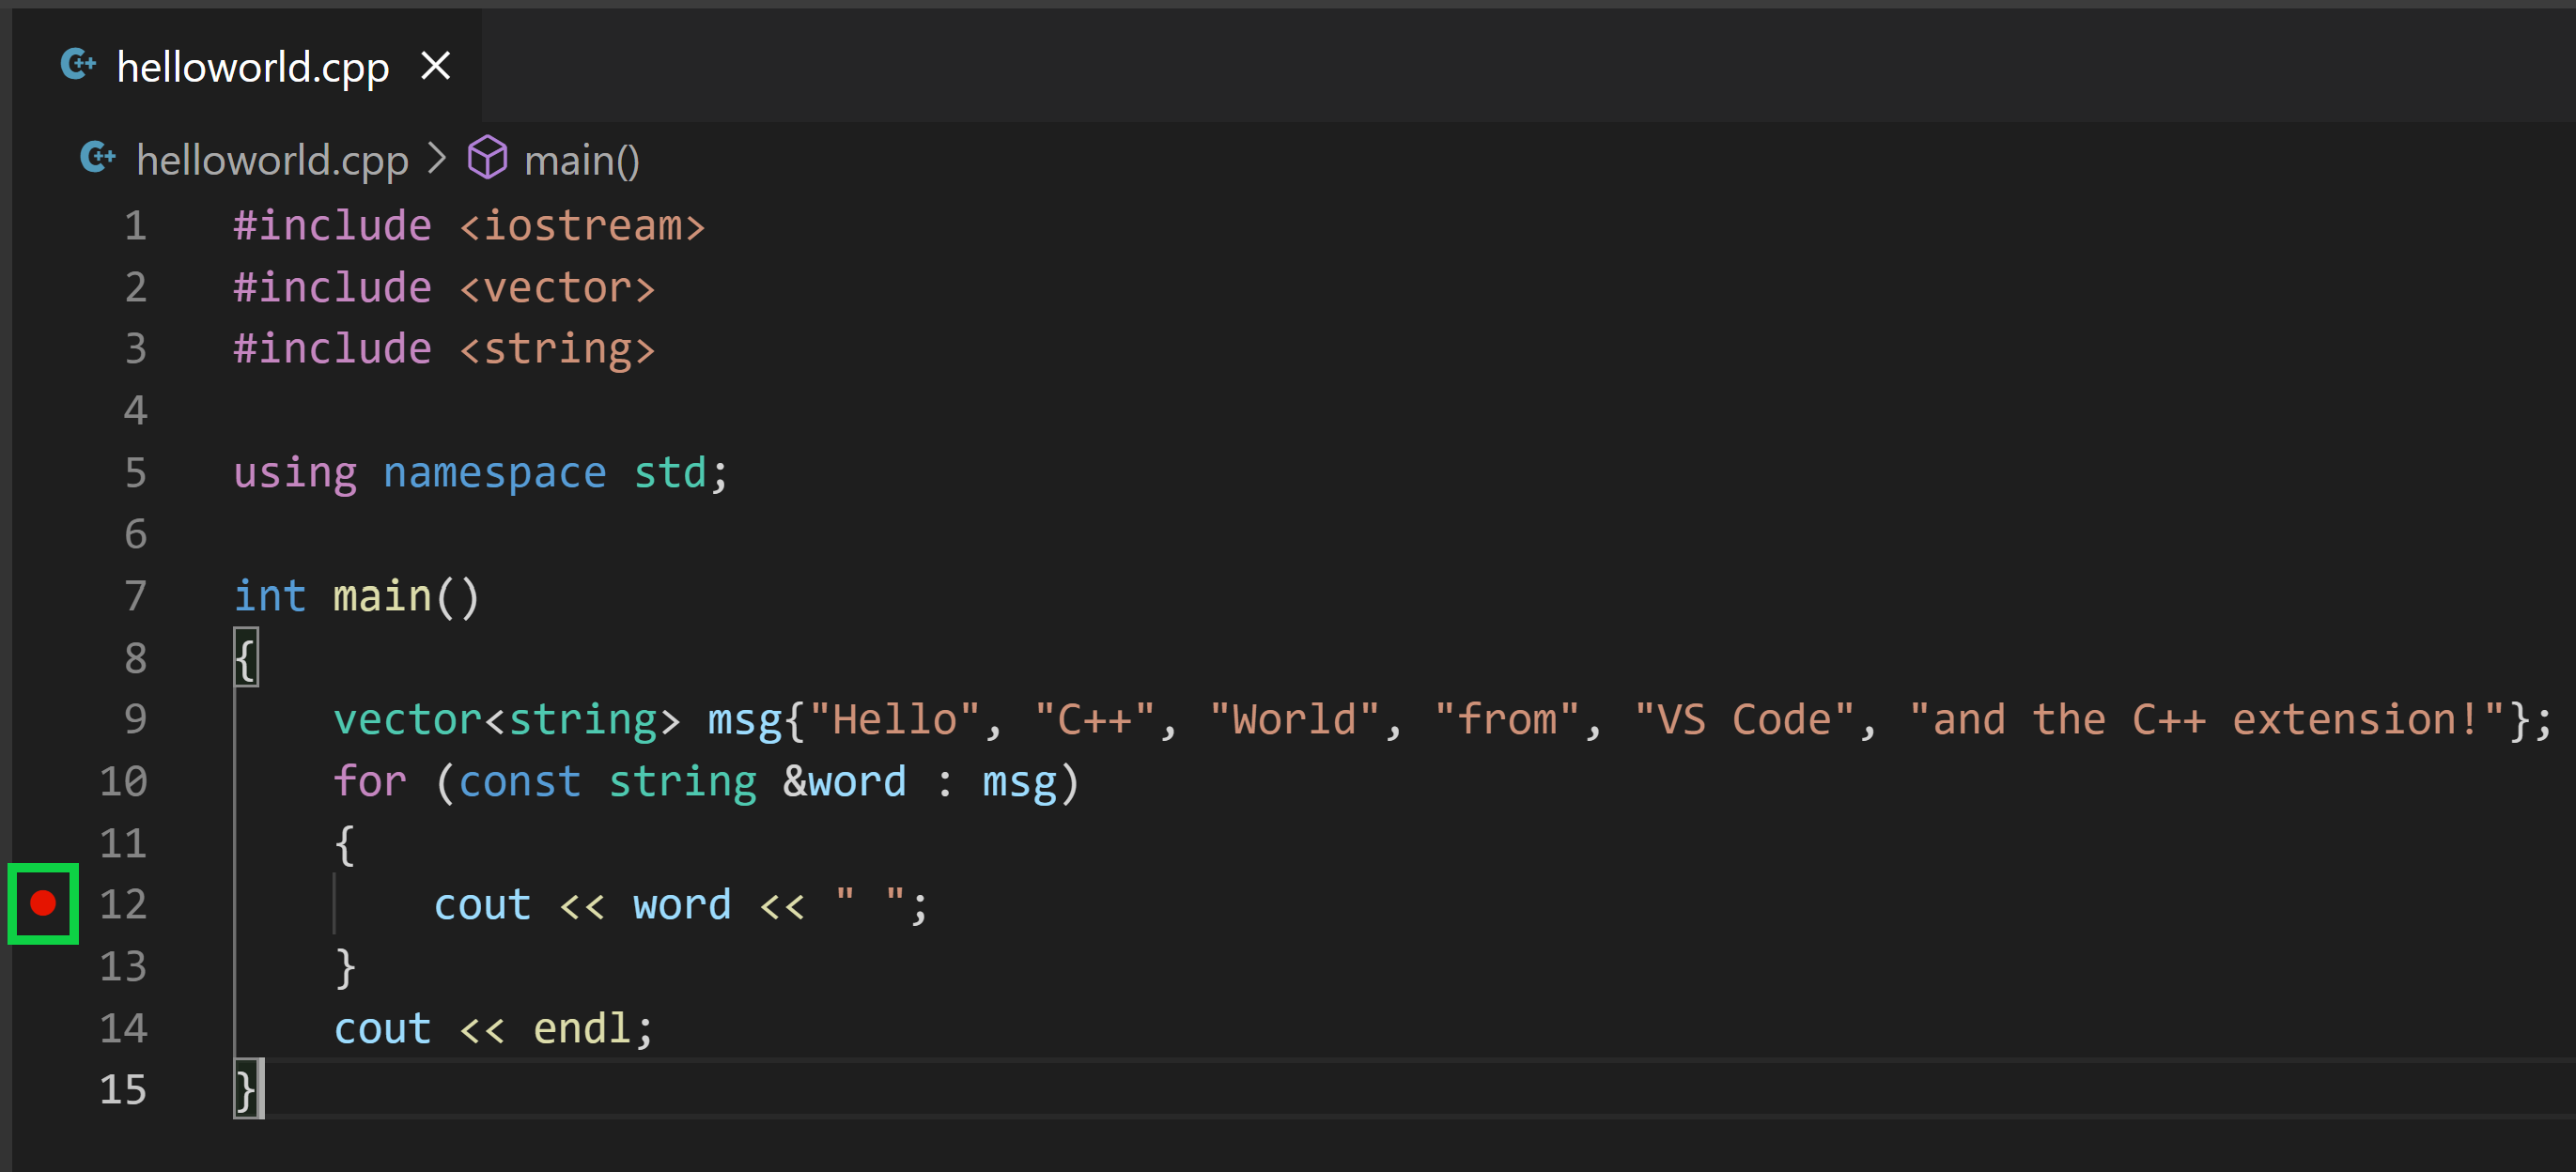
- 在程式碼下一個中斷點,並且點及旁邊的執行按鈕並且選擇Debug就可以開始除錯了
 {: w=”700” h=”400” }
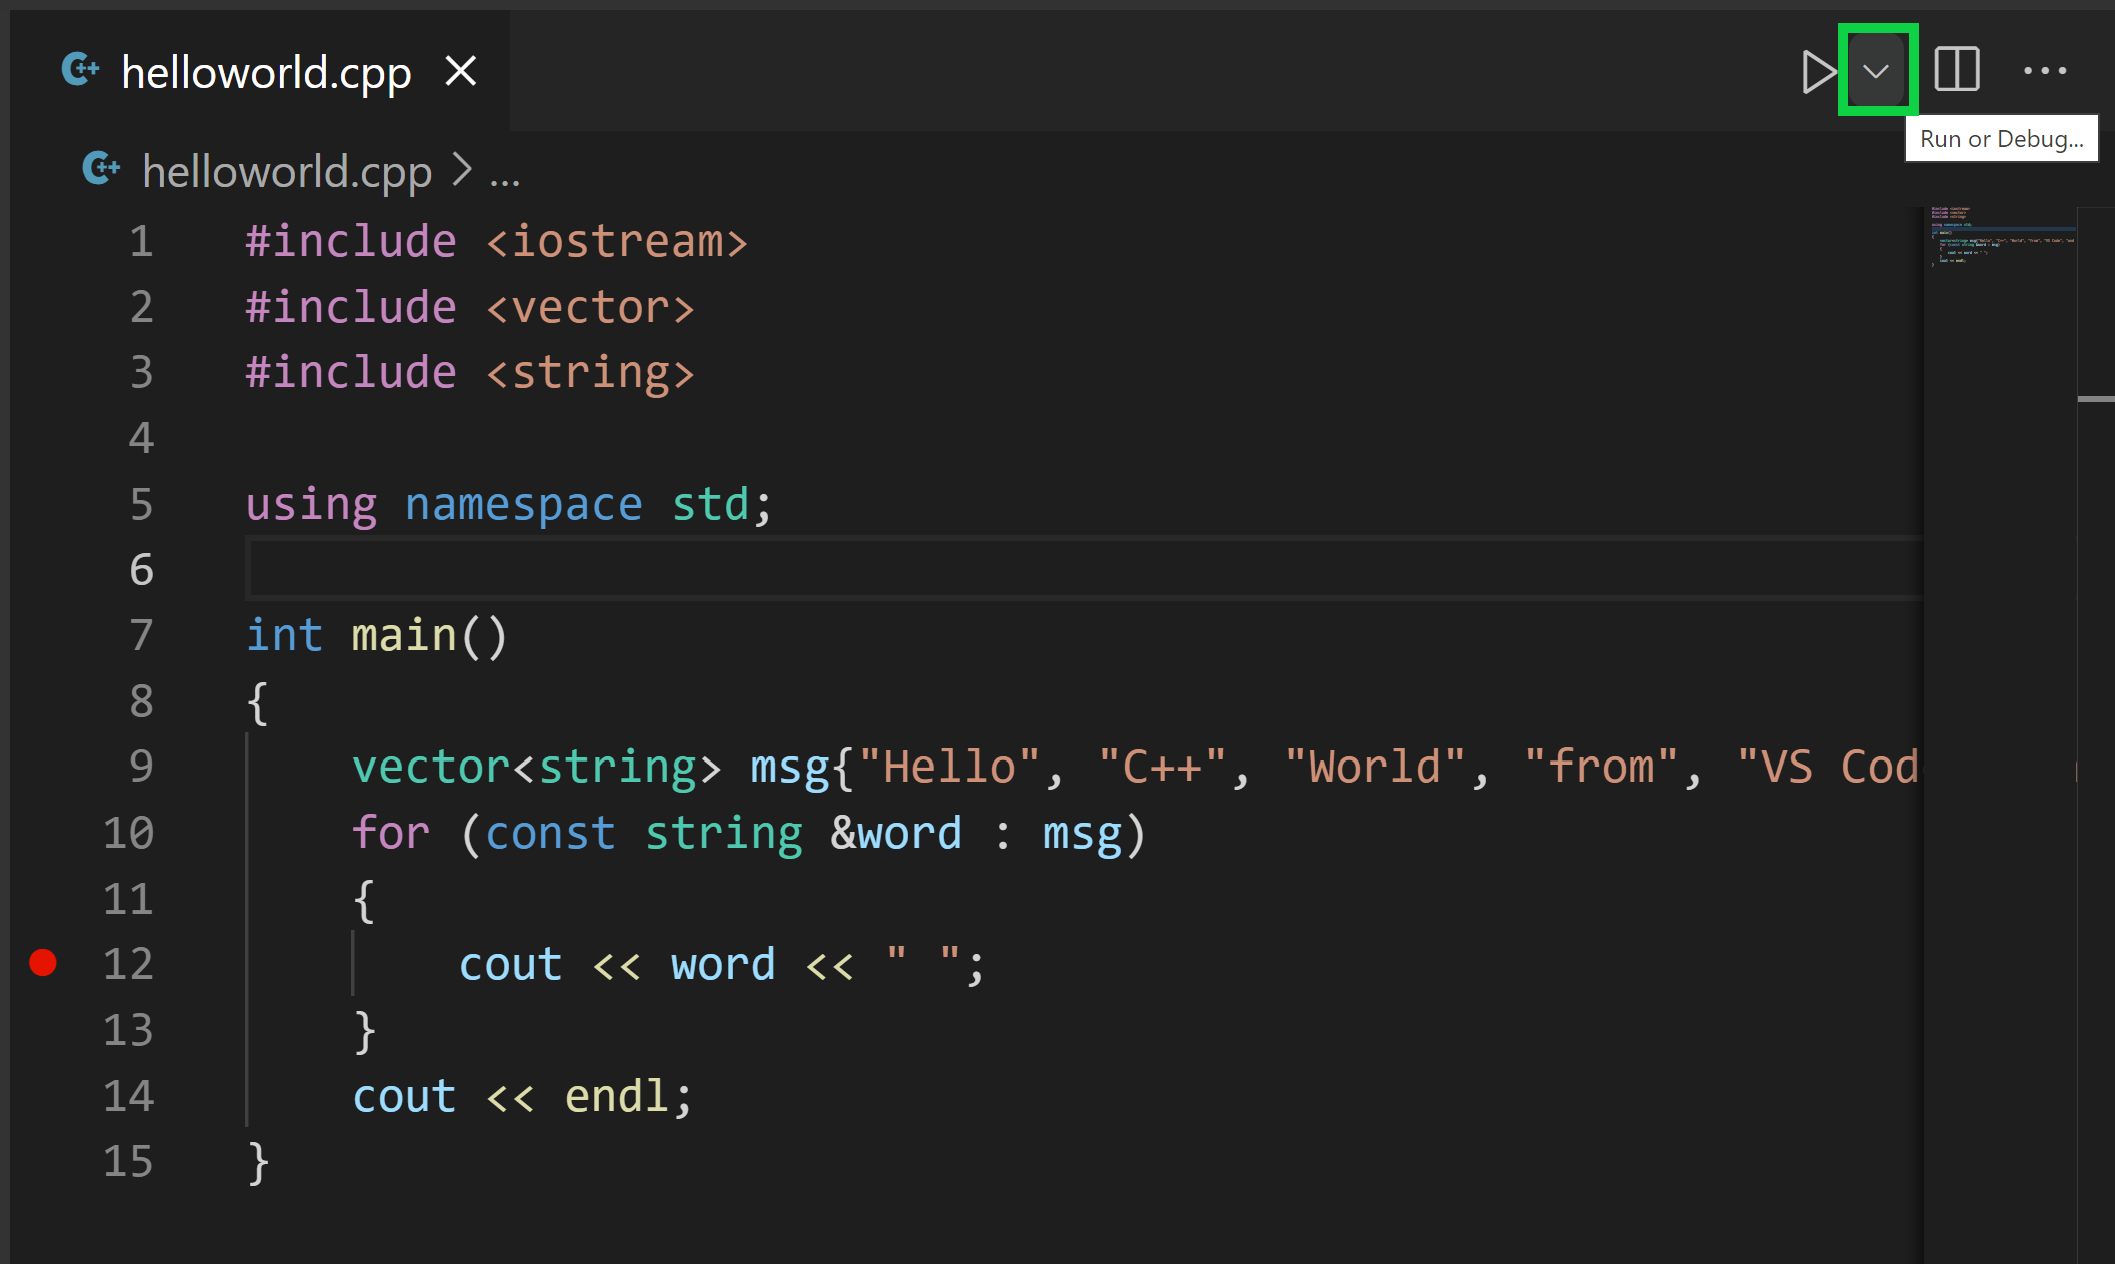 {: w=”700” h=”400” }
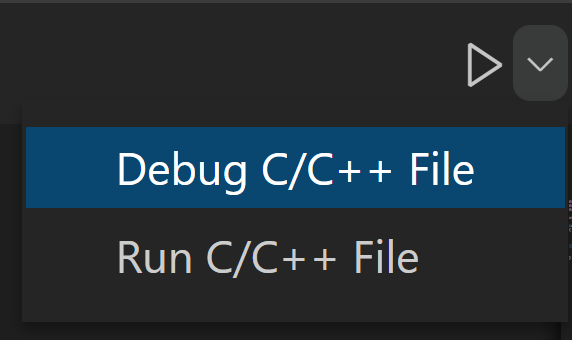 {: w=”350” h=”200” }
設定在啟動程式時傳入參數給程式
如果像在啟動程式時傳入一些參數,可以利用launch.json,要建立launch.json只需要案價旁邊的齒輪並選擇G++,VSCode就會自動幫你建立一份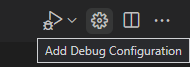 {: w=”350” h=”200” }
 {: w=”700” h=”400” }
在launch.json裡面有幾個的比較重要的點
program是要執行的執行檔名稱,也就是我們編譯後產生的helloworld檔args是執行時要傳給執行檔的參數
C/C++的其他設定
通常編寫C/C++的時候也會用到很多函式庫,我們可以指定這些函式庫的路徑讓VSCode的Intelligence Scope懂這些函式庫。
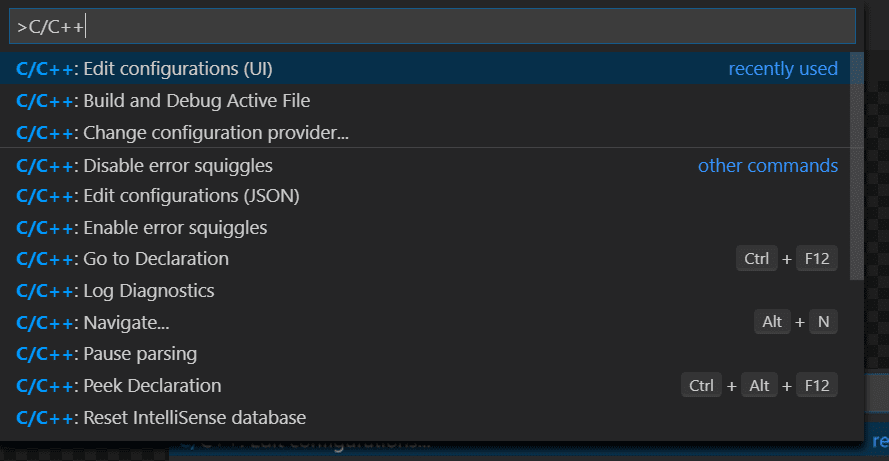
首先按下Ctrl+Shift+P並且輸入C/C++,按下C/C++: Edit Configurations (UI),後VSCode會幫我們產生一個c_cpp_properties.json。
在Include path的地方加入我們要包含的路徑。或者我們也可以在c_cpp_properties.jsonconfigurations下的includePath直接做修改
 {: w=”700” h=”400” }
g++ include OpenCV函式庫
首先我們先按照Linux安裝prebuild函式庫以OpenCV為例這篇文章安裝prebuild的OpenCV library。
接下來建立一個ShowImage.cpp
1 |
|
{: file=’ShowImage.cpp’}
我們可以發現VSCode的Intelligence scope找不到OpenCV標頭檔而顯示紅色虛線。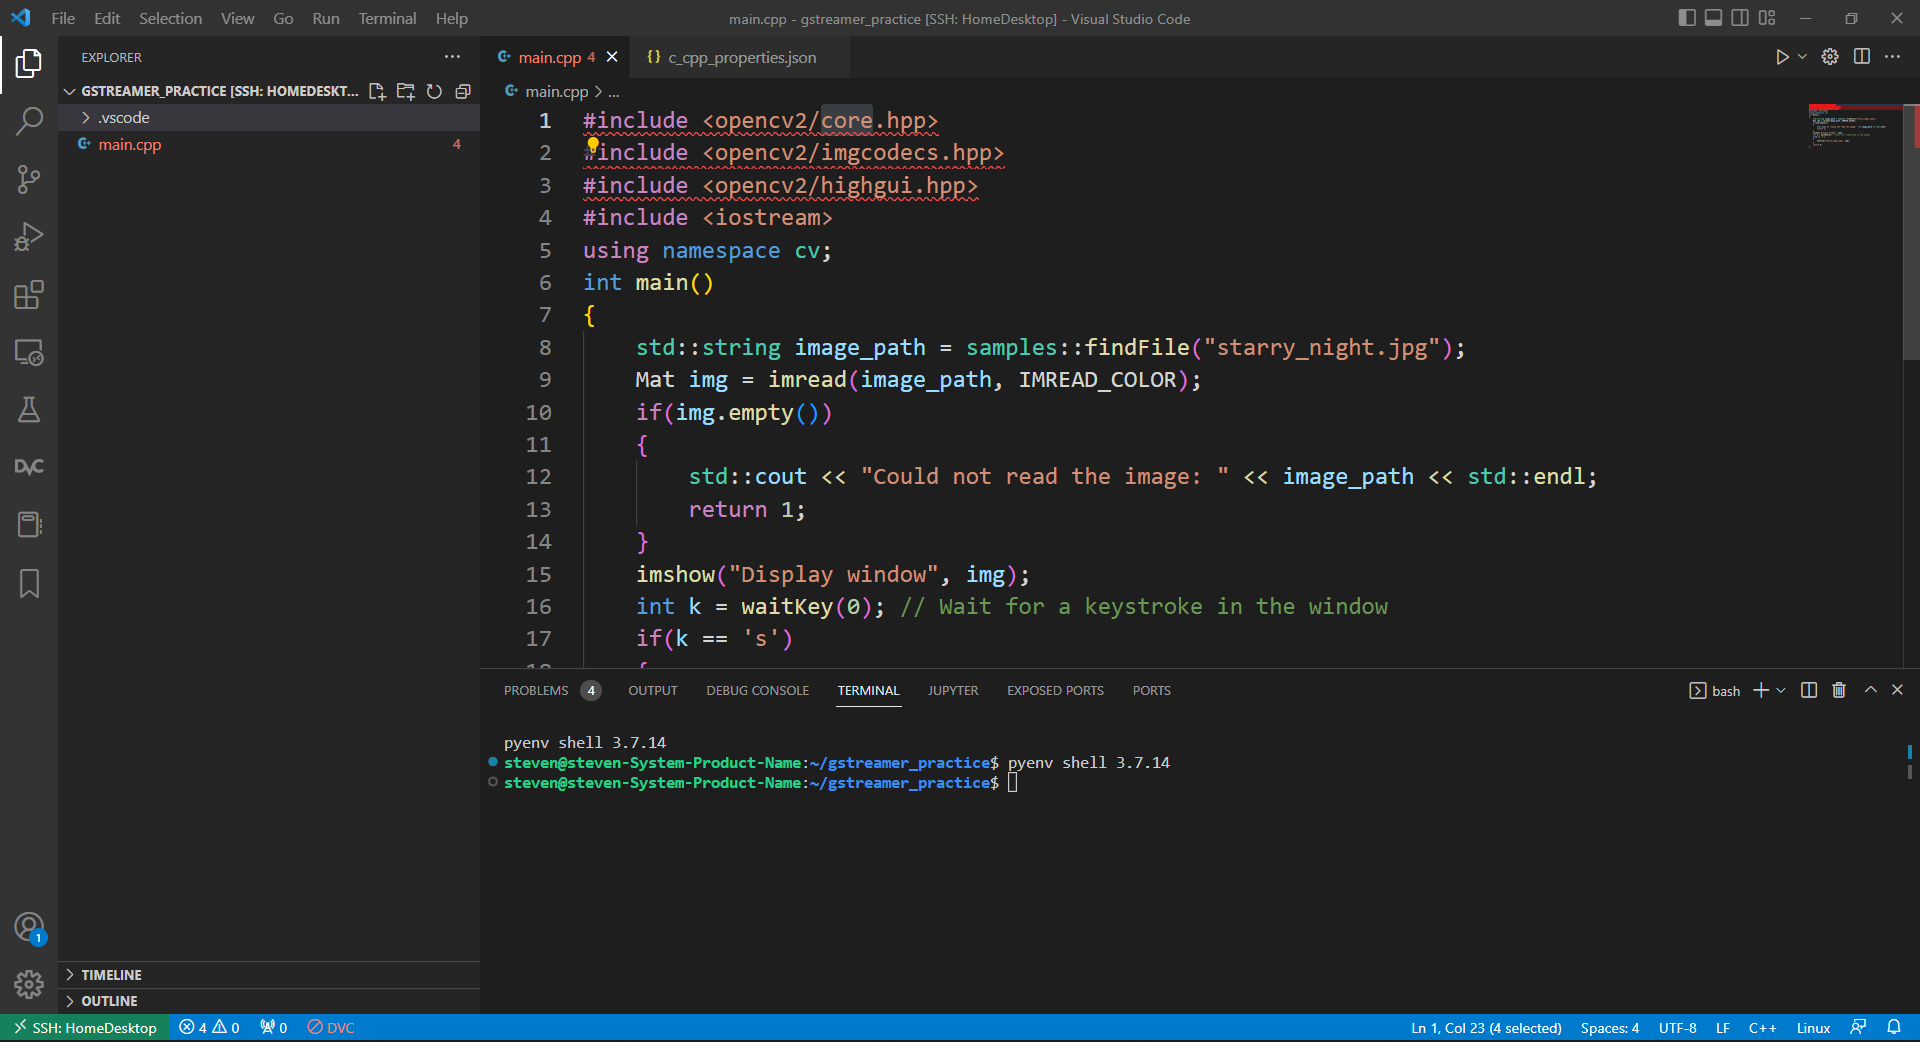 {: w=”700” h=”400” }
這時候我們需要修改前面步驟提到的c_cpp_properties.jsoninclude OpenCV的路徑就可以了,而因為我們是安裝prebuild的OpenCV,所以我們的標頭檔已經被安裝在/usr/include/opencv4/裡面,因此修改後的c_cpp_properties.json如下。我們在includePath的清單中加入了/usr/include/opencv4/**,之後你就可以看到Intelligence scope成功認出OpenCV,而且OpenCV的函示可以順利顯示說明文字
1 | { |
{: file=’c_cpp_properties.json’}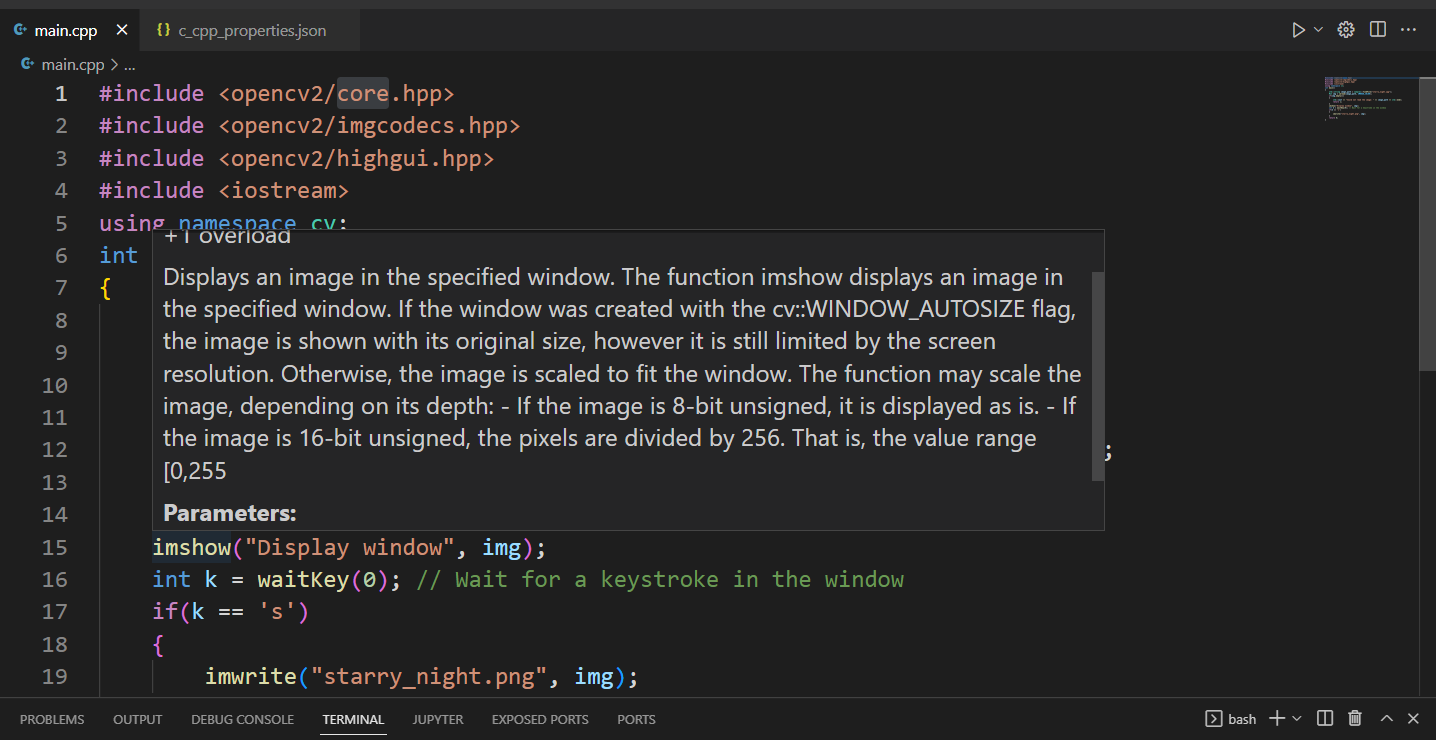 {: w=”700” h=”400” }
不過這時候g++依然不知道OpenCV的標頭檔在哪裡,所以如果直接編譯還是會出錯。
pkg-config幫我們列出全部的標頭檔位置和opencv的名稱
標頭檔路徑只需要加上g++選項-I/usr/include/opencv4就可以了,不過如果要把所有用到的library都手動寫出來實在很麻煩,這時候pkg-config可以幫我們把全部的opencv library全部列出來,我們可以試看看在終端機輸入下面指令pkg-config --libs --cflags opencv4(如果安裝的是opencv 2.x或3.x要輸入pkg-config --libs --cflags opencv),終端機的回應應該會長的像下面這樣。
1 | $ pkg-config --libs --cflags opencv4 |
我們可以發現回傳的文字可以直接當成g++的選項來用,因此我們修改tasks.json,在給g++的參數args的list加入
1 | "`pkg-config --libs --cflags opencv4`" |
改好後tasks.json如下,注意pkg-config --libs --cflags opencv4被兩個引號包圍,因為原本g++的指令是長這樣
1 | /usr/bin/g++ -g main.cpp -o main `pkg-config --libs --cflags opencv4` |
1 | { |
{: file=’tasks.json’}
接下來VSCode就可以順利編譯程式並產生執行檔了。
用CMake管理跨Windows和Linux的C++專案以Darknet為例
如果開發團隊中有人用Windows OS開發,有人用Linux OS開發,而Windows的人只熟悉Visual Studio。這時候要一起合作完成專案在編譯的時候就會遇到困難。CMake跨平台的專案產生器就是專門解決這個問題。只要寫好一次CMake檔,他就可以在Windows幫你產生Visual Studio專案檔.sln,或是在Linux產生Makefile。很多時候我們會想要直接編譯別人的開源程式,這裡我們將以Darknet作為範例。開始這個範例之前你必須先在電腦上安裝好OPenCV
下載Darknet
1 | git clone git@github.com:AlexeyAB/darknet.git |
建立CMake的task.json
按下ctrl + shift + p並且輸入task,選擇Tasks: Configure task,然後再選擇CMake: build,就task設定就會產生在${workspaceFolder}/.vscode/tasks.json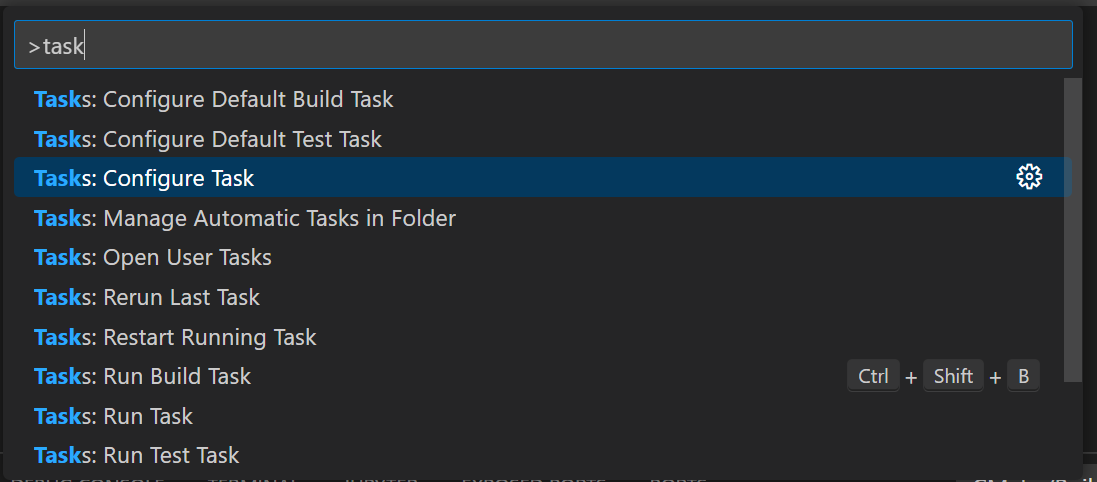
1 | { |
{: file=’task.json’}
這個檔案會編譯所有的CMake Targets,你也可以指定你想編譯的targets。
設定build參數
首先我們先查看Darknet有哪些CMake項可以設定,輸入cmake -S . -B build -LH就可以看到選項。在這個範例不想要使用CUDA,所以要把ENABLE_CUDA:BOOL=ON設為OFF。我們可以建立一個設定檔在${workspaceFolder}/.vscode/settings.json,並且輸入以下內容。更多其他的CMake設定可以在這裡查到。另外因為Darknet已經存在build資料夾,所以我們指定其他資料夾作為build資料夾cmake.buildDirectory": "${workspaceFolder}/local-build,不過通常我們可以直接用預設值,並不需要另外設定cmake.buildDirectory
1 | { |
CMake Config
首先我們要先跑一次CMake Config,按下ctrl + shift + p輸入cmake選擇CMake:Configure,在Output的地方會看到有沒有錯誤,如果出現錯誤歡迎在下面留言板留言。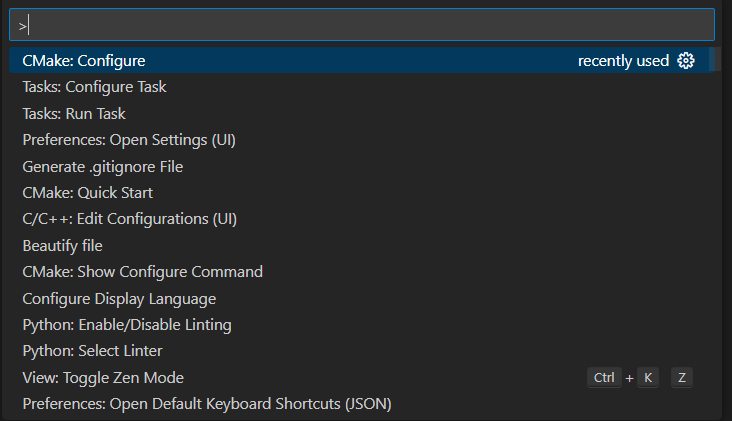
建立launch.json
接下來要設定啟動,先建立一個launch.json位於${workspaceFolder}/.vscode/launch.json,並且複製以下內容。在這裡用到許多CMake extension提供的變數,可以在這裡查詢更多的變數。
1 | { |
{= file:’launch.json’}
設定啟動時參數
首先要先下載yolov1.cfg和yolov1.weights並且放到cfg資料夾
Darknet執行檔啟動時需要參數,我們可以在launch.json的args設定。
1 | "args": ["detect", "cfg/yolov1.cfg", "cfg/yolov1.weights", "data/dog.jpg"], |
執行
參考:
Build with CMake Tools
https://github.com/microsoft/vscode-cmake-tools/blob/f4804bcd2d376b4ad850c537d6ebdae46cfdcf3c/docs/build.md
https://code.visualstudio.com/docs/cpp/config-linux
Display an image in an OpenCV window
https://docs.opencv.org/4.x/db/deb/tutorial_display_image.html
pkg-config尋找opencv函式庫
https://answers.opencv.org/question/227890/using-l-in-g-command-line/
Get started with CMake Tools on Linux
https://code.visualstudio.com/docs/cpp/cmake-linux
CMake Tools for Visual Studio Code documentation
https://github.com/microsoft/vscode-cmake-tools/blob/main/docs/README.md
Guide: “A modern, open source C++ dev environment with Visual Studio Code, vcpkg, and CMake”
https://www.reddit.com/r/cpp/comments/j1dh9w/guide_a_modern_open_source_c_dev_environment_with/
timedatectl 時間管理工具
- 顯示目前的設定狀態
1
2# 顯示目前狀態
timedatectl
1 | Local time: 三 2023-04-26 11:00:22 CST |
啟動網路校時
輸入下面指令後,就會打開網路校時功能1
2# 啟用 NTP 校時
timedatectl set-ntp yesUbuntu使用的是
systemd-timesyncd,因此等一下要設定systemd-timesyncd檢查
systemd-timesyncd服務狀態1
2# 檢查 systemd-timesyncd 服務狀態
systemctl status systemd-timesyncd
1 | ● systemd-timesyncd.service - Network Time Synchronization |
- 設定校時伺服器
要設定校時伺服器可以用root權限編輯以下檔案/etc/systemd/timesyncd.conf
1 | [Time] |
重新啟動
systemd-timesyncd服務
重啟服務讓更改生效1
2# 重新啟動 systemd-timesyncd 服務
systemctl restart systemd-timesyncd檢查一下是不是有跟NTP校時了
用指令systemctl status systemd-timesyncd看一下目前服務狀態,如果有更新成功會顯示出來
錯誤排除
- 出現Server has too large root distance. Disconnecting.訊息
表示機器跟ntp server之間回應的時間太久,因此可以去修改/etc/systemd/timesyncd.conf並加入RootDistanceMaxSec=,通常30秒已經很夠用了1
2
3
4
5
6
7See timesyncd.conf(5) for details.
[Time]
NTP=10.10.1.30
FallbackNTP=
RootDistanceMaxSec=30
PollIntervalMinSec=32
PollIntervalMaxSec=2048
timedatectl的NTP service為active的時候查看目前使用的是哪一個NTP服務
- systemd-timesyncd
1
systemctl status systemd-timesyncd.service
ntpd 或 chronyd
1 | ps -e | grep ntp |
1 | ps -e | grep chrony |
chronyc說明書
https://chrony-project.org/doc/4.6.1/chronyc.html
詳細說明如下
https://unix.stackexchange.com/a/655489
參考:
https://www.cnblogs.com/pipci/p/12833228.html
https://officeguide.cc/ubuntu-linux-timedatectl-time-synchronization-tutorial/
https://www.digitalocean.com/community/tutorials/how-to-set-up-time-synchronization-on-ubuntu-20-04
https://www.tenable.com/audits/items/CIS_Ubuntu_18.04_LTS_Server_v2.1.0_L1.audit:26286d27c59292cfdb9c7b04593edbed
https://serverfault.com/questions/1024770/ubuntu-20-04-time-sync-problems-and-possibly-incorrect-status-information