lsblk #找出硬碟的名稱 sudo parted -a opt /dev/sda mkpart primary ext4 0% 100% #分割磁碟 sudo mkfs.ext4 -L datapartition /dev/sda1 #格式化磁碟並加加上label datapartition #You can add a partition label with the -L flag. Select a name that will help you identify this particular drive
將資料碟mount在一個暫時的資料夾下面
1 2
sudo mkdir /mnt/tmp sudo mount /dev/sdb1 /mnt/tmp
複製原本/home裡面的資料
1
sudo rsync -avx /home/ /mnt/tmp
建立/home的永久mount點
先用以下指令查詢資料碟的UUID
1
sudo blkid
用sudo nano /etc/fstab # or any other editor將下面一行寫入/etc/fstab文件最後面來設定mount點
1
UUID=<noted number from above> /home ext4 defaults 0 2
重開機檢查是否生效
(危險區)刪除舊的/home
以下指令會刪掉舊的/home。務必先unmount新的home以免刪錯
1 2
sudo umount /home # unmount the new home first! sudo rm -rf /home/* # deletes the old home
/* Start playing */ gst_element_set_state (pipeline, GST_STATE_PLAYING);
/* Wait until error or EOS */ bus = gst_element_get_bus (pipeline); msg = gst_bus_timed_pop_filtered (bus, GST_CLOCK_TIME_NONE, GST_MESSAGE_ERROR | GST_MESSAGE_EOS);
/* See next tutorial for proper error message handling/parsing */ if (GST_MESSAGE_TYPE (msg) == GST_MESSAGE_ERROR) { g_error ("An error occurred! Re-run with the GST_DEBUG=*:WARN environment " "variable set for more details."); }
/* Wait until error or EOS */ bus = gst_element_get_bus (pipeline); msg = gst_bus_timed_pop_filtered (bus, GST_CLOCK_TIME_NONE, GST_MESSAGE_ERROR | GST_MESSAGE_EOS);
/* Start playing */ ret = gst_element_set_state (pipeline, GST_STATE_PLAYING); if (ret == GST_STATE_CHANGE_FAILURE) { g_printerr ("Unable to set the pipeline to the playing state.\n"); gst_object_unref (pipeline); return-1; }
/* Wait until error or EOS */ bus = gst_element_get_bus (pipeline); msg = gst_bus_timed_pop_filtered (bus, GST_CLOCK_TIME_NONE, GST_MESSAGE_ERROR | GST_MESSAGE_EOS);
switch (GST_MESSAGE_TYPE (msg)) { case GST_MESSAGE_ERROR: gst_message_parse_error (msg, &err, &debug_info); g_printerr ("Error received from element %s: %s\n", GST_OBJECT_NAME (msg->src), err->message); g_printerr ("Debugging information: %s\n", debug_info ? debug_info : "none"); g_clear_error (&err); g_free (debug_info); break; case GST_MESSAGE_EOS: g_print ("End-Of-Stream reached.\n"); break; default: /* We should not reach here because we only asked for ERRORs and EOS */ g_printerr ("Unexpected message received.\n"); break; } gst_message_unref (msg); }
/* Start playing */ ret = gst_element_set_state (pipeline, GST_STATE_PLAYING); if (ret == GST_STATE_CHANGE_FAILURE) { g_printerr ("Unable to set the pipeline to the playing state.\n"); gst_object_unref (pipeline); return-1; }
switch (GST_MESSAGE_TYPE (msg)) { case GST_MESSAGE_ERROR: gst_message_parse_error (msg, &err, &debug_info); g_printerr ("Error received from element %s: %s\n", GST_OBJECT_NAME (msg->src), err->message); g_printerr ("Debugging information: %s\n", debug_info ? debug_info : "none"); g_clear_error (&err); g_free (debug_info); break; case GST_MESSAGE_EOS: g_print ("End-Of-Stream reached.\n"); break; default: /* We should not reach here because we only asked for ERRORs and EOS */ g_printerr ("Unexpected message received.\n"); break; } gst_message_unref (msg); }
/* Structure to contain all our information, so we can pass it to callbacks */ typedefstruct _CustomData { GstElement *pipeline; GstElement *source; GstElement *convert; GstElement *resample; GstElement *sink; } CustomData;
/* Handler for the pad-added signal */ staticvoidpad_added_handler(GstElement *src, GstPad *pad, CustomData *data);
/* Create the empty pipeline */ data.pipeline = gst_pipeline_new ("test-pipeline");
if (!data.pipeline || !data.source || !data.convert || !data.resample || !data.sink) { g_printerr ("Not all elements could be created.\n"); return-1; }
/* Build the pipeline. Note that we are NOT linking the source at this * point. We will do it later. */ gst_bin_add_many (GST_BIN (data.pipeline), data.source, data.convert, data.resample, data.sink, NULL); if (!gst_element_link_many (data.convert, data.resample, data.sink, NULL)) { g_printerr ("Elements could not be linked.\n"); gst_object_unref (data.pipeline); return-1; }
/* Set the URI to play */ g_object_set (data.source, "uri", "https://www.freedesktop.org/software/gstreamer-sdk/data/media/sintel_trailer-480p.webm", NULL);
/* Connect to the pad-added signal */ g_signal_connect (data.source, "pad-added", G_CALLBACK (pad_added_handler), &data);
/* Start playing */ ret = gst_element_set_state (data.pipeline, GST_STATE_PLAYING); if (ret == GST_STATE_CHANGE_FAILURE) { g_printerr ("Unable to set the pipeline to the playing state.\n"); gst_object_unref (data.pipeline); return-1; }
/* Listen to the bus */ bus = gst_element_get_bus (data.pipeline); do { msg = gst_bus_timed_pop_filtered (bus, GST_CLOCK_TIME_NONE, GST_MESSAGE_STATE_CHANGED | GST_MESSAGE_ERROR | GST_MESSAGE_EOS);
/* This function will be called by the pad-added signal */ staticvoidpad_added_handler(GstElement *src, GstPad *new_pad, CustomData *data) { GstPad *sink_pad = gst_element_get_static_pad (data->convert, "sink"); GstPadLinkReturn ret; GstCaps *new_pad_caps = NULL; GstStructure *new_pad_struct = NULL; const gchar *new_pad_type = NULL;
g_print ("Received new pad '%s' from '%s':\n", GST_PAD_NAME (new_pad), GST_ELEMENT_NAME (src));
/* If our converter is already linked, we have nothing to do here */ if (gst_pad_is_linked (sink_pad)) { g_print ("We are already linked. Ignoring.\n"); gotoexit; }
/* Check the new pad's type */ new_pad_caps = gst_pad_get_current_caps (new_pad); new_pad_struct = gst_caps_get_structure (new_pad_caps, 0); new_pad_type = gst_structure_get_name (new_pad_struct); if (!g_str_has_prefix (new_pad_type, "audio/x-raw")) { g_print ("It has type '%s' which is not raw audio. Ignoring.\n", new_pad_type); gotoexit; }
/* Attempt the link */ ret = gst_pad_link (new_pad, sink_pad); if (GST_PAD_LINK_FAILED (ret)) { g_print ("Type is '%s' but link failed.\n", new_pad_type); } else { g_print ("Link succeeded (type '%s').\n", new_pad_type); }
exit: /* Unreference the new pad's caps, if we got them */ if (new_pad_caps != NULL) gst_caps_unref (new_pad_caps);
/* Unreference the sink pad */ gst_object_unref (sink_pad); }
{:file=’basic-tutorial-3.c’}
解說
首先我們先將資料組成一個struct以便後面使用
1 2 3 4 5 6 7 8
/* Structure to contain all our information, so we can pass it to callbacks */ typedef struct _CustomData { GstElement *pipeline; GstElement *source; GstElement *convert; GstElement *resample; GstElement *sink; } CustomData;
接下來這行是forward reference晚一點會實做這個函式。
1
2
/* Handler for the pad-added signal */ static void pad_added_handler (GstElement *src, GstPad *pad, CustomData *data);
接下來建立element,在這裡uridecodebin會自動初始化需要的element(sources, demuxers and decoders)以便將URI轉換成影音串流。跟playbin比起來他只完成了一半,因為它包含了demuxers,所以只有到執行階段的時候source pad才會被初始化。
接下來我們將converter, resample and sink這些element連接起來。注意這時候還不可以連接source,因為這時候souce還沒有source pad。
1 2 3 4 5
if (!gst_element_link_many (data.convert, data.resample, data.sink, NULL)) { g_printerr ("Elements could not be linked.\n"); gst_object_unref (data.pipeline); return-1; }
然後設定source要讀取的URI
1 2
/* Set the URI to play */ g_object_set (data.source, "uri", "https://www.freedesktop.org/software/gstreamer-sdk/data/media/sintel_trailer-480p.webm", NULL);
/* If our converter is already linked, we have nothing to do here */ if (gst_pad_is_linked (sink_pad)) { g_print ("We are already linked. Ignoring.\n"); gotoexit; }
/* Attempt the link */ ret = gst_pad_link (new_pad, sink_pad); if (GST_PAD_LINK_FAILED (ret)) { g_print ("Type is '%s' but link failed.\n", new_pad_type); } else { g_print ("Link succeeded (type '%s').\n", new_pad_type); }
case GST_MESSAGE_STATE_CHANGED: /* We are only interested in state-changed messages from the pipeline */ if (GST_MESSAGE_SRC (msg) == GST_OBJECT (data.pipeline)) { GstState old_state, new_state, pending_state; gst_message_parse_state_changed (msg, &old_state, &new_state, &pending_state); g_print ("Pipeline state changed from %s to %s:\n", gst_element_state_get_name (old_state), gst_element_state_get_name (new_state)); } break;
/* Structure to contain all our information, so we can pass it around */ typedefstruct _CustomData { GstElement *playbin; /* Our one and only element */ gboolean playing; /* Are we in the PLAYING state? */ gboolean terminate; /* Should we terminate execution? */ gboolean seek_enabled; /* Is seeking enabled for this media? */ gboolean seek_done; /* Have we performed the seek already? */ gint64 duration; /* How long does this media last, in nanoseconds */ } CustomData;
/* Forward definition of the message processing function */ staticvoidhandle_message(CustomData *data, GstMessage *msg);
/* Create the elements */ data.playbin = gst_element_factory_make ("playbin", "playbin");
if (!data.playbin) { g_printerr ("Not all elements could be created.\n"); return-1; }
/* Set the URI to play */ g_object_set (data.playbin, "uri", "https://www.freedesktop.org/software/gstreamer-sdk/data/media/sintel_trailer-480p.webm", NULL);
/* Start playing */ ret = gst_element_set_state (data.playbin, GST_STATE_PLAYING); if (ret == GST_STATE_CHANGE_FAILURE) { g_printerr ("Unable to set the pipeline to the playing state.\n"); gst_object_unref (data.playbin); return-1; }
/* Listen to the bus */ bus = gst_element_get_bus (data.playbin); do { msg = gst_bus_timed_pop_filtered (bus, 100 * GST_MSECOND, GST_MESSAGE_STATE_CHANGED | GST_MESSAGE_ERROR | GST_MESSAGE_EOS | GST_MESSAGE_DURATION);
/* Parse message */ if (msg != NULL) { handle_message (&data, msg); } else { /* We got no message, this means the timeout expired */ if (data.playing) { gint64 current = -1;
/* Query the current position of the stream */ if (!gst_element_query_position (data.playbin, GST_FORMAT_TIME, ¤t)) { g_printerr ("Could not query current position.\n"); }
/* If we didn't know it yet, query the stream duration */ if (!GST_CLOCK_TIME_IS_VALID (data.duration)) { if (!gst_element_query_duration (data.playbin, GST_FORMAT_TIME, &data.duration)) { g_printerr ("Could not query current duration.\n"); } }
/* Print current position and total duration */ g_print ("Position %" GST_TIME_FORMAT " / %" GST_TIME_FORMAT "\r", GST_TIME_ARGS (current), GST_TIME_ARGS (data.duration));
/* If seeking is enabled, we have not done it yet, and the time is right, seek */ if (data.seek_enabled && !data.seek_done && current > 10 * GST_SECOND) { g_print ("\nReached 10s, performing seek...\n"); gst_element_seek_simple (data.playbin, GST_FORMAT_TIME, GST_SEEK_FLAG_FLUSH | GST_SEEK_FLAG_KEY_UNIT, 30 * GST_SECOND); data.seek_done = TRUE; } } } } while (!data.terminate);
switch (GST_MESSAGE_TYPE (msg)) { case GST_MESSAGE_ERROR: gst_message_parse_error (msg, &err, &debug_info); g_printerr ("Error received from element %s: %s\n", GST_OBJECT_NAME (msg->src), err->message); g_printerr ("Debugging information: %s\n", debug_info ? debug_info : "none"); g_clear_error (&err); g_free (debug_info); data->terminate = TRUE; break; case GST_MESSAGE_EOS: g_print ("End-Of-Stream reached.\n"); data->terminate = TRUE; break; case GST_MESSAGE_DURATION: /* The duration has changed, mark the current one as invalid */ data->duration = GST_CLOCK_TIME_NONE; break; case GST_MESSAGE_STATE_CHANGED: { GstState old_state, new_state, pending_state; gst_message_parse_state_changed (msg, &old_state, &new_state, &pending_state); if (GST_MESSAGE_SRC (msg) == GST_OBJECT (data->playbin)) { g_print ("Pipeline state changed from %s to %s:\n", gst_element_state_get_name (old_state), gst_element_state_get_name (new_state));
/* Remember whether we are in the PLAYING state or not */ data->playing = (new_state == GST_STATE_PLAYING);
if (data->playing) { /* We just moved to PLAYING. Check if seeking is possible */ GstQuery *query; gint64 start, end; query = gst_query_new_seeking (GST_FORMAT_TIME); if (gst_element_query (data->playbin, query)) { gst_query_parse_seeking (query, NULL, &data->seek_enabled, &start, &end); if (data->seek_enabled) { g_print ("Seeking is ENABLED from %" GST_TIME_FORMAT " to %" GST_TIME_FORMAT "\n", GST_TIME_ARGS (start), GST_TIME_ARGS (end)); } else { g_print ("Seeking is DISABLED for this stream.\n"); } } else { g_printerr ("Seeking query failed."); } gst_query_unref (query); } } } break; default: /* We should not reach here */ g_printerr ("Unexpected message received.\n"); break; } gst_message_unref (msg); }
定義資料struct
1 2 3 4 5 6 7 8 9 10 11 12
/* Structure to contain all our information, so we can pass it around */ typedefstruct _CustomData { GstElement *playbin; /* Our one and only element */ gboolean playing; /* Are we in the PLAYING state? */ gboolean terminate; /* Should we terminate execution? */ gboolean seek_enabled; /* Is seeking enabled for this media? */ gboolean seek_done; /* Have we performed the seek already? */ gint64 duration; /* How long does this media last, in nanoseconds */ } CustomData;
/* Forward definition of the message processing function */ staticvoidhandle_message(CustomData *data, GstMessage *msg);
/* We got no message, this means the timeout expired */ if (data.playing) {
接著用GstElement提供的方法取得時間。
1 2 3 4
/* Query the current position of the stream */ if (!gst_element_query_position (data.pipeline, GST_FORMAT_TIME, ¤t)) { g_printerr ("Could not query current position.\n"); }
如果無法取得就改成檢查是否可以詢問stream的長度
1 2 3 4 5 6
/* If we didn't know it yet, query the stream duration */ if (!GST_CLOCK_TIME_IS_VALID (data.duration)) { if (!gst_element_query_duration (data.pipeline, GST_FORMAT_TIME, &data.duration)) { g_printerr ("Could not query current duration.\n"); } }
接下來就可以詢問影片長度
1 2 3
/* Print current position and total duration */ g_print ("Position %" GST_TIME_FORMAT " / %" GST_TIME_FORMAT "\r", GST_TIME_ARGS (current), GST_TIME_ARGS (data.duration));
下一段是在影片時間軸跳躍的程式,利用gst_element_seek_simple()來達成。
1 2 3 4 5 6 7
/* If seeking is enabled, we have not done it yet, and the time is right, seek */ if (data.seek_enabled && !data.seek_done && current > 10 * GST_SECOND) { g_print ("\nReached 10s, performing seek...\n"); gst_element_seek_simple (data.pipeline, GST_FORMAT_TIME, GST_SEEK_FLAG_FLUSH | GST_SEEK_FLAG_KEY_UNIT, 30 * GST_SECOND); data.seek_done = TRUE; }
GST_FORMAT_TIME: 目標時間的格式
GstSeekFlags: 指令跳躍的行為
GST_SEEK_FLAG_FLUSH: 直接拋棄掉目標時間之前的所有畫面。
GST_SEEK_FLAG_KEY_UNIT: 移動到目標時間附近的key frame
GST_SEEK_FLAG_ACCURATE: 精準的移動到目標時間上。
目標時間: 是指定要跳躍到的時間位置
Message Pump
首先如果影片長度改變我們就先讓pipeline不能被詢問影片時間。
1 2 3 4
case GST_MESSAGE_DURATION: /* The duration has changed, mark the current one as invalid */ data->duration = GST_CLOCK_TIME_NONE; break;
case GST_MESSAGE_STATE_CHANGED: { GstState old_state, new_state, pending_state; gst_message_parse_state_changed (msg, &old_state, &new_state, &pending_state); if (GST_MESSAGE_SRC (msg) == GST_OBJECT (data->playbin)) { g_print ("Pipeline state changed from %s to %s:\n", gst_element_state_get_name (old_state), gst_element_state_get_name (new_state));
/* Remember whether we are in the PLAYING state or not */ data->playing = (new_state == GST_STATE_PLAYING);
if (data->playing) { /* We just moved to PLAYING. Check if seeking is possible */ GstQuery *query; gint64 start, end; query = gst_query_new_seeking (GST_FORMAT_TIME); if (gst_element_query (data->playbin, query)) { gst_query_parse_seeking (query, NULL, &data->seek_enabled, &start, &end); if (data->seek_enabled) { g_print ("Seeking is ENABLED from %" GST_TIME_FORMAT " to %" GST_TIME_FORMAT "\n", GST_TIME_ARGS (start), GST_TIME_ARGS (end)); } else { g_print ("Seeking is DISABLED for this stream.\n"); } } else { g_printerr ("Seeking query failed."); } gst_query_unref (query); } } }
/* Prints information about a Pad Template, including its Capabilities */ staticvoidprint_pad_templates_information(GstElementFactory * factory) { const GList *pads; GstStaticPadTemplate *padtemplate;
g_print ("Pad Templates for %s:\n", gst_element_factory_get_longname (factory)); if (!gst_element_factory_get_num_pad_templates (factory)) { g_print (" none\n"); return; }
/* Shows the CURRENT capabilities of the requested pad in the given element */ staticvoidprint_pad_capabilities(GstElement *element, gchar *pad_name) { GstPad *pad = NULL; GstCaps *caps = NULL;
/* Retrieve pad */ pad = gst_element_get_static_pad (element, pad_name); if (!pad) { g_printerr ("Could not retrieve pad '%s'\n", pad_name); return; }
/* Retrieve negotiated caps (or acceptable caps if negotiation is not finished yet) */ caps = gst_pad_get_current_caps (pad); if (!caps) caps = gst_pad_query_caps (pad, NULL);
/* Print and free */ g_print ("Caps for the %s pad:\n", pad_name); print_caps (caps, " "); gst_caps_unref (caps); gst_object_unref (pad); }
/* Create the element factories */ source_factory = gst_element_factory_find ("audiotestsrc"); sink_factory = gst_element_factory_find ("autoaudiosink"); if (!source_factory || !sink_factory) { g_printerr ("Not all element factories could be created.\n"); return-1; }
/* Print information about the pad templates of these factories */ print_pad_templates_information (source_factory); print_pad_templates_information (sink_factory);
/* Ask the factories to instantiate actual elements */ source = gst_element_factory_create (source_factory, "source"); sink = gst_element_factory_create (sink_factory, "sink");
/* Create the empty pipeline */ pipeline = gst_pipeline_new ("test-pipeline");
if (!pipeline || !source || !sink) { g_printerr ("Not all elements could be created.\n"); return-1; }
/* Build the pipeline */ gst_bin_add_many (GST_BIN (pipeline), source, sink, NULL); if (gst_element_link (source, sink) != TRUE) { g_printerr ("Elements could not be linked.\n"); gst_object_unref (pipeline); return-1; }
/* Start playing */ ret = gst_element_set_state (pipeline, GST_STATE_PLAYING); if (ret == GST_STATE_CHANGE_FAILURE) { g_printerr ("Unable to set the pipeline to the playing state (check the bus for error messages).\n"); }
/* Wait until error, EOS or State Change */ bus = gst_element_get_bus (pipeline); do { msg = gst_bus_timed_pop_filtered (bus, GST_CLOCK_TIME_NONE, GST_MESSAGE_ERROR | GST_MESSAGE_EOS | GST_MESSAGE_STATE_CHANGED);
switch (GST_MESSAGE_TYPE (msg)) { case GST_MESSAGE_ERROR: gst_message_parse_error (msg, &err, &debug_info); g_printerr ("Error received from element %s: %s\n", GST_OBJECT_NAME (msg->src), err->message); g_printerr ("Debugging information: %s\n", debug_info ? debug_info : "none"); g_clear_error (&err); g_free (debug_info); terminate = TRUE; break; case GST_MESSAGE_EOS: g_print ("End-Of-Stream reached.\n"); terminate = TRUE; break; case GST_MESSAGE_STATE_CHANGED: /* We are only interested in state-changed messages from the pipeline */ if (GST_MESSAGE_SRC (msg) == GST_OBJECT (pipeline)) { GstState old_state, new_state, pending_state; gst_message_parse_state_changed (msg, &old_state, &new_state, &pending_state); g_print ("\nPipeline state changed from %s to %s:\n", gst_element_state_get_name (old_state), gst_element_state_get_name (new_state)); /* Print the current capabilities of the sink element */ print_pad_capabilities (sink, "sink"); } break; default: /* We should not reach here because we only asked for ERRORs, EOS and STATE_CHANGED */ g_printerr ("Unexpected message received.\n"); break; } gst_message_unref (msg); } } while (!terminate);
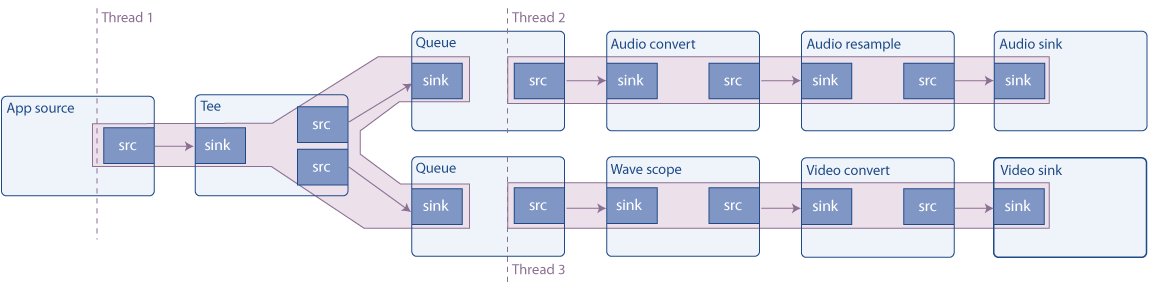
/* Link all elements that can be automatically linked because they have "Always" pads */ gst_bin_add_many (GST_BIN (pipeline), audio_source, tee, audio_queue, audio_convert, audio_resample, audio_sink, video_queue, visual, video_convert, video_sink, NULL); if (gst_element_link_many (audio_source, tee, NULL) != TRUE || gst_element_link_many (audio_queue, audio_convert, audio_resample, audio_sink, NULL) != TRUE || gst_element_link_many (video_queue, visual, video_convert, video_sink, NULL) != TRUE) { g_printerr ("Elements could not be linked.\n"); gst_object_unref (pipeline); return-1; }
/* Manually link the Tee, which has "Request" pads */ tee_audio_pad = gst_element_get_request_pad (tee, "src_%u"); g_print ("Obtained request pad %s for audio branch.\n", gst_pad_get_name (tee_audio_pad)); queue_audio_pad = gst_element_get_static_pad (audio_queue, "sink"); tee_video_pad = gst_element_get_request_pad (tee, "src_%u"); g_print ("Obtained request pad %s for video branch.\n", gst_pad_get_name (tee_video_pad)); queue_video_pad = gst_element_get_static_pad (video_queue, "sink"); if (gst_pad_link (tee_audio_pad, queue_audio_pad) != GST_PAD_LINK_OK || gst_pad_link (tee_video_pad, queue_video_pad) != GST_PAD_LINK_OK) { g_printerr ("Tee could not be linked.\n"); gst_object_unref (pipeline); return-1; } gst_object_unref (queue_audio_pad); gst_object_unref (queue_video_pad);
/* Start playing the pipeline */ gst_element_set_state (pipeline, GST_STATE_PLAYING);
/* Wait until error or EOS */
bus = gst_element_get_bus (pipeline);
msg =
    gst_bus_timed_pop_filtered (bus, GST_CLOCK_TIME_NONE,
    GST_MESSAGE_ERROR | GST_MESSAGE_EOS);
/* Release the request pads from the Tee, and unref them */ gst_element_release_request_pad (tee, tee_audio_pad); gst_element_release_request_pad (tee, tee_video_pad); gst_object_unref (tee_audio_pad); gst_object_unref (tee_video_pad);
/* Link all elements that can be automatically linked because they have "Always" pads */ gst_bin_add_many (GST_BIN (pipeline), audio_source, tee, audio_queue, audio_convert, audio_sink, video_queue, visual, video_convert, video_sink, NULL); if (gst_element_link_many (audio_source, tee, NULL) != TRUE || gst_element_link_many (audio_queue, audio_convert, audio_sink, NULL) != TRUE || gst_element_link_many (video_queue, visual, video_convert, video_sink, NULL) != TRUE) { g_printerr ("Elements could not be linked.\n"); gst_object_unref (pipeline); return-1; }
/* Manually link the Tee, which has "Request" pads */ tee_audio_pad = gst_element_get_request_pad (tee, "src_%u"); g_print ("Obtained request pad %s for audio branch.\n", gst_pad_get_name (tee_audio_pad)); queue_audio_pad = gst_element_get_static_pad (audio_queue, "sink"); tee_video_pad = gst_element_get_request_pad (tee, "src_%u"); g_print ("Obtained request pad %s for video branch.\n", gst_pad_get_name (tee_video_pad)); queue_video_pad = gst_element_get_static_pad (video_queue, "sink"); if (gst_pad_link (tee_audio_pad, queue_audio_pad) != GST_PAD_LINK_OK || gst_pad_link (tee_video_pad, queue_video_pad) != GST_PAD_LINK_OK) { g_printerr ("Tee could not be linked.\n"); gst_object_unref (pipeline); return-1; } gst_object_unref (queue_audio_pad); gst_object_unref (queue_video_pad);
最後在程式結束後,要記得釋放request pad
1 2 3 4 5
/* Release the request pads from the Tee, and unref them */ gst_element_release_request_pad (tee, tee_audio_pad); gst_element_release_request_pad (tee, tee_video_pad); gst_object_unref (tee_audio_pad); gst_object_unref (tee_video_pad);
#define CHUNK_SIZE 1024 /* Amount of bytes we are sending in each buffer */ #define SAMPLE_RATE 44100 /* Samples per second we are sending */
/* Structure to contain all our information, so we can pass it to callbacks */ typedefstruct _CustomData { GstElement *pipeline, *app_source, *tee, *audio_queue, *audio_convert1, *audio_resample, *audio_sink; GstElement *video_queue, *audio_convert2, *visual, *video_convert, *video_sink; GstElement *app_queue, *app_sink;
guint64 num_samples; /* Number of samples generated so far (for timestamp generation) */ gfloat a, b, c, d; /* For waveform generation */
guint sourceid; /* To control the GSource */
GMainLoop *main_loop; /* GLib's Main Loop */ } CustomData;
/* This method is called by the idle GSource in the mainloop, to feed CHUNK_SIZE bytes into appsrc. * The idle handler is added to the mainloop when appsrc requests us to start sending data (need-data signal) * and is removed when appsrc has enough data (enough-data signal). */ static gboolean push_data(CustomData *data) { GstBuffer *buffer; GstFlowReturn ret; int i; GstMapInfo map; gint16 *raw; gint num_samples = CHUNK_SIZE / 2; /* Because each sample is 16 bits */ gfloat freq;
/* Create a new empty buffer */ buffer = gst_buffer_new_and_alloc (CHUNK_SIZE);
/* Set its timestamp and duration */ GST_BUFFER_TIMESTAMP (buffer) = gst_util_uint64_scale (data->num_samples, GST_SECOND, SAMPLE_RATE); GST_BUFFER_DURATION (buffer) = gst_util_uint64_scale (num_samples, GST_SECOND, SAMPLE_RATE);
/* Push the buffer into the appsrc */ g_signal_emit_by_name (data->app_source, "push-buffer", buffer, &ret);
/* Free the buffer now that we are done with it */ gst_buffer_unref (buffer);
if (ret != GST_FLOW_OK) { /* We got some error, stop sending data */ return FALSE; }
return TRUE; }
/* This signal callback triggers when appsrc needs data. Here, we add an idle handler * to the mainloop to start pushing data into the appsrc */ staticvoidstart_feed(GstElement *source, guint size, CustomData *data) { if (data->sourceid == 0) { g_print ("Start feeding\n"); data->sourceid = g_idle_add ((GSourceFunc) push_data, data); } }
/* This callback triggers when appsrc has enough data and we can stop sending. * We remove the idle handler from the mainloop */ staticvoidstop_feed(GstElement *source, CustomData *data) { if (data->sourceid != 0) { g_print ("Stop feeding\n"); g_source_remove (data->sourceid); data->sourceid = 0; } }
/* The appsink has received a buffer */ static GstFlowReturn new_sample(GstElement *sink, CustomData *data) { GstSample *sample;
/* Retrieve the buffer */ g_signal_emit_by_name (sink, "pull-sample", &sample); if (sample) { /* The only thing we do in this example is print a * to indicate a received buffer */ g_print ("*"); gst_sample_unref (sample); return GST_FLOW_OK; }
return GST_FLOW_ERROR; }
/* This function is called when an error message is posted on the bus */ staticvoiderror_cb(GstBus *bus, GstMessage *msg, CustomData *data) { GError *err; gchar *debug_info;
/* Print error details on the screen */ gst_message_parse_error (msg, &err, &debug_info); g_printerr ("Error received from element %s: %s\n", GST_OBJECT_NAME (msg->src), err->message); g_printerr ("Debugging information: %s\n", debug_info ? debug_info : "none"); g_clear_error (&err); g_free (debug_info);
/* Link all elements that can be automatically linked because they have "Always" pads */ gst_bin_add_many (GST_BIN (data.pipeline), data.app_source, data.tee, data.audio_queue, data.audio_convert1, data.audio_resample, data.audio_sink, data.video_queue, data.audio_convert2, data.visual, data.video_convert, data.video_sink, data.app_queue, data.app_sink, NULL); if (gst_element_link_many (data.app_source, data.tee, NULL) != TRUE || gst_element_link_many (data.audio_queue, data.audio_convert1, data.audio_resample, data.audio_sink, NULL) != TRUE || gst_element_link_many (data.video_queue, data.audio_convert2, data.visual, data.video_convert, data.video_sink, NULL) != TRUE || gst_element_link_many (data.app_queue, data.app_sink, NULL) != TRUE) { g_printerr ("Elements could not be linked.\n"); gst_object_unref (data.pipeline); return-1; }
/* Manually link the Tee, which has "Request" pads */ tee_audio_pad = gst_element_request_pad_simple (data.tee, "src_%u"); g_print ("Obtained request pad %s for audio branch.\n", gst_pad_get_name (tee_audio_pad)); queue_audio_pad = gst_element_get_static_pad (data.audio_queue, "sink"); tee_video_pad = gst_element_request_pad_simple (data.tee, "src_%u"); g_print ("Obtained request pad %s for video branch.\n", gst_pad_get_name (tee_video_pad)); queue_video_pad = gst_element_get_static_pad (data.video_queue, "sink"); tee_app_pad = gst_element_request_pad_simple (data.tee, "src_%u"); g_print ("Obtained request pad %s for app branch.\n", gst_pad_get_name (tee_app_pad)); queue_app_pad = gst_element_get_static_pad (data.app_queue, "sink"); if (gst_pad_link (tee_audio_pad, queue_audio_pad) != GST_PAD_LINK_OK || gst_pad_link (tee_video_pad, queue_video_pad) != GST_PAD_LINK_OK || gst_pad_link (tee_app_pad, queue_app_pad) != GST_PAD_LINK_OK) { g_printerr ("Tee could not be linked\n"); gst_object_unref (data.pipeline); return-1; } gst_object_unref (queue_audio_pad); gst_object_unref (queue_video_pad); gst_object_unref (queue_app_pad);
/* Instruct the bus to emit signals for each received message, and connect to the interesting signals */ bus = gst_element_get_bus (data.pipeline); gst_bus_add_signal_watch (bus); g_signal_connect (G_OBJECT (bus), "message::error", (GCallback)error_cb, &data); gst_object_unref (bus);
/* Start playing the pipeline */ gst_element_set_state (data.pipeline, GST_STATE_PLAYING);
/* Create a GLib Main Loop and set it to run */ data.main_loop = g_main_loop_new (NULL, FALSE); g_main_loop_run (data.main_loop);
/* Release the request pads from the Tee, and unref them */ gst_element_release_request_pad (data.tee, tee_audio_pad); gst_element_release_request_pad (data.tee, tee_video_pad); gst_element_release_request_pad (data.tee, tee_app_pad); gst_object_unref (tee_audio_pad); gst_object_unref (tee_video_pad); gst_object_unref (tee_app_pad);
/* This signal callback triggers when appsrc needs data. Here, we add an idle handler * to the mainloop to start pushing data into the appsrc */ staticvoidstart_feed(GstElement *source, guint size, CustomData *data) { if (data->sourceid == 0) { g_print ("Start feeding\n"); data->sourceid = g_idle_add ((GSourceFunc) push_data, data); } }
下面這個callback function當appsrc內部的queue滿的時候會被呼叫。在這裡我們就直接用g_source_remove()移除idle function
1 2 3 4 5 6 7 8 9
/* This callback triggers when appsrc has enough data and we can stop sending. * We remove the idle handler from the mainloop */ staticvoidstop_feed(GstElement *source, CustomData *data) { if (data->sourceid != 0) { g_print ("Stop feeding\n"); g_source_remove (data->sourceid); data->sourceid = 0; } }
/* This method is called by the idle GSource in the mainloop, to feed CHUNK_SIZE bytes into appsrc. * The ide handler is added to the mainloop when appsrc requests us to start sending data (need-data signal) * and is removed when appsrc has enough data (enough-data signal). */ static gboolean push_data(CustomData *data) { GstBuffer *buffer; GstFlowReturn ret; int i; gint16 *raw; gint num_samples = CHUNK_SIZE / 2; /* Because each sample is 16 bits */ gfloat freq;
/* Create a new empty buffer */ buffer = gst_buffer_new_and_alloc (CHUNK_SIZE);
/* Set its timestamp and duration */ GST_BUFFER_TIMESTAMP (buffer) = gst_util_uint64_scale (data->num_samples, GST_SECOND, SAMPLE_RATE); GST_BUFFER_DURATION (buffer) = gst_util_uint64_scale (num_samples, GST_SECOND, SAMPLE_RATE);
/* Generate some psychodelic waveforms */ raw = (gint16 *)GST_BUFFER_DATA (buffer);
最後就是把生成好的資料推送進appsrc裡面,並且會觸發push-buffer訊號。
1 2 3 4 5
/* Push the buffer into the appsrc */ g_signal_emit_by_name (data->app_source, "push-buffer", buffer, &ret);
/* Free the buffer now that we are done with it */ gst_buffer_unref (buffer);
| # | Name | Description | |---|---------|----------------------------------------------------------------| | 0 | none | No debug information is output. | | 1 | ERROR | Logs all fatal errors. These are errors that do not allow the | | | | core or elements to perform the requested action. The | | | | application can still recover if programmed to handle the | | | | conditions that triggered the error. | | 2 | WARNING | Logs all warnings. Typically these are non-fatal, but | | | | user-visible problems are expected to happen. | | 3 | FIXME | Logs all "fixme" messages. Those typically that a codepath that| | | | is known to be incomplete has been triggered. It may work in | | | | most cases, but may cause problems in specific instances. | | 4 | INFO | Logs all informational messages. These are typically used for | | | | events in the system that only happen once, or are important | | | | and rare enough to be logged at this level. | | 5 | DEBUG | Logs all debug messages. These are general debug messages for | | | | events that happen only a limited number of times during an | | | | object's lifetime; these include setup, teardown, change of | | | | parameters, etc. | | 6 | LOG | Logs all log messages. These are messages for events that | | | | happen repeatedly during an object's lifetime; these include | | | | streaming and steady-state conditions. This is used for log | | | | messages that happen on every buffer in an element for example.| | 7 | TRACE | Logs all trace messages. Those are message that happen very | | | | very often. This is for example is each time the reference | | | | count of a GstMiniObject, such as a GstBuffer or GstEvent, is | | | | modified. | | 9 | MEMDUMP | Logs all memory dump messages. This is the heaviest logging and| | | | may include dumping the content of blocks of memory. | +------------------------------------------------------------------------------+
/* Build the pipeline */ pipeline = gst_parse_launch ("playbin uri=https://www.freedesktop.org/software/gstreamer-sdk/data/media/sintel_trailer-480p.webm", NULL); bus = gst_element_get_bus (pipeline);
/* Start playing */ ret = gst_element_set_state (pipeline, GST_STATE_PLAYING); if (ret == GST_STATE_CHANGE_FAILURE) { g_printerr ("Unable to set the pipeline to the playing state.\n"); gst_object_unref (pipeline); return-1; } elseif (ret == GST_STATE_CHANGE_NO_PREROLL) { data.is_live = TRUE; }
/* Start playing */ ret = gst_element_set_state (pipeline, GST_STATE_PLAYING); if (ret == GST_STATE_CHANGE_FAILURE) { g_printerr ("Unable to set the pipeline to the playing state.\n"); gst_object_unref (pipeline); return-1; } elseif (ret == GST_STATE_CHANGE_NO_PREROLL) { data.is_live = TRUE; }
case GST_MESSAGE_CLOCK_LOST: /* Get a new clock */ gst_element_set_state (data->pipeline, GST_STATE_PAUSED); gst_element_set_state (data->pipeline, GST_STATE_PLAYING); break;
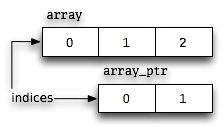
C Traps and Pitfalls 的 “Understanding Declarations”小節提到如何解讀指標。每一個C的變數宣告可以拆成兩個部分。
型態
一串將會回傳這個型態的表達式
float f, g;代表f, g將會回傳float float ff();代表ff()將會回傳float,因此ff是一個function並且會回傳float float *pf;代表*pf江會回傳float,因此pf是一個pointer float *g(), (*h)();首先()的優先度大於*因此*g() 可以改寫成*(g()),由此可知g是function並且會回傳一個pointer to a float的指標。而(*h)()代表h是一個pointer to a function指標,而且這個function會回傳float。
GNU gdb (Ubuntu 12.1-0ubuntu1~22.04) 12.1 Copyright (C) 2022 Free Software Foundation, Inc. License GPLv3+: GNU GPL version 3 or later <http://gnu.org/licenses/gpl.html> ..... For help, type "help". Type "apropos word" to search for commands related to "word"... Reading symbols from python... Reading symbols from /usr/lib/debug/.build-id/75/c83caa11a9418b8e5ae8feb0bb8f2e5d00c47b.debug...
如果你看到(No debugging symbols found in python)表示GDB找不到Python debug symbols。
GDB下中斷點
這一步會預先建立一個中斷點,引為此時我們的extension還沒被Python載入。再這個範例我們把中斷點下在myadd.cpp第12行z = x + y的位置
1
(gdb)b myadd.cpp:12
這時候GDB會問你是不是要建立一個未來使用的中斷點,回答是就可以
1 2 3
(gdb) b myadd.cpp:12 No source file named myadd.cpp. Make breakpoint pending on future shared library load? (y or [n])
sample standard devitaion: 為了得到有意義的變異測量值,將sample variance開根號後就可以得到sample standard devitaion
$$s = \sqrt{s^2}$$
$$s^2 = $$ sample variance(樣本變異數) $$s = $$ sample standard devitaion(樣本標準差) $$\sigma^2 =$$ population variance(母體變異數) $$\sigma =$$ population standard devitaion(母體標準差)
gcc -g <any other flags e.g. -Wall> -o <file> <file.c>
開啟GDB session
在終端機輸入gdb和執行檔名稱即可開啟gdb session
1 2 3 4 5 6 7 8 9
gdb <program_name> GNU gdb (Ubuntu 12.1-0ubuntu1~22.04) 12.1 Copyright (C) 2022 Free Software Foundation, Inc. License GPLv3+: GNU GPL version 3 or later <http://gnu.org/licenses/gpl.html> ... For help, type "help". Type "apropos word" to search for commands related to "word"... Reading symbols from factorial... (gdb)
//This program calculates and prints out the factorials of 5 and 17
#include<stdio.h> #include<stdlib.h>
intfactorial(int n);
intmain(void) { int n = 5; int f = factorial(n); printf("The factorial of %d is %d.\n", n, f); n = 17; f = factorial(n); printf("The factorial of %d is %d.\n", n, f);
return0; } //A factorial is calculated by n! = n * (n - 1) * (n - 2) * ... * 1 //E.g. 5! = 5 * 4 * 3 * 2 * 1 = 120 intfactorial(int n) { int f = 1; int i = 1; while (i <= n) { f = f * i; i++; } return f; }
$ gdb corrupted_linked_list (gdb) run 0->0->0->0->0->0->0->0->0->0->0->0->0->0->0->0->0->0->0->0->0->0->0->0->0->0->0->0->0->0->0->0->0->0->0->0->0->0->0 **ctrl + c** Program received signal SIGINT, Interrupt. 0x00007fffff1272c0 in __write_nocancel () at ../sysdeps/unix/syscall-template.S:84 84 ../sysdeps/unix/syscall-template.S: No such file or directory.
中斷後我們可以用where指令看一下目前所在的位置,輸出會類似如下
1 2 3 4 5 6 7 8 9 10 11 12
(gdb) where #0 0x00007fffff1272c0 in __write_nocancel () at ../sysdeps/unix/syscall-template.S:84 #1 0x00007fffff0a8bff in _IO_new_file_write (f=0x7fffff3f5620 <_IO_2_1_stdout_>, data=0x6020f0, n=512) at fileops.c:1263 #2 0x00007fffff0aa409 in new_do_write (to_do=512, data=0x6020f0 "0->0->0->0->0->0->0->0->0->0->0->0->0->0->0->0->0->0->0->0->0->0->0->0->0->0->0->0->0->0->0->0->0->0->0->0->0->0->0->0->0->0->0->0->0->0->0->0->0->0->0->0->0->0->0->0->0->0->0->0->0->0->0->0->0->0->0-"..., fp=0x7fffff3f5620 <_IO_2_1_stdout_>) at fileops.c:518 #3 _IO_new_do_write (fp=0x7fffff3f5620 <_IO_2_1_stdout_>, data=0x6020f0 "0->0->0->0->0->0->0->0->0->0->0->0->0->0->0->0->0->0->0->0->0->0->0->0->0->0->0->0->0->0->0->0->0->0->0->0->0->0->0->0->0->0->0->0->0->0->0->0->0->0->0->0->0->0->0->0->0->0->0->0->0->0->0->0->0->0->0-"..., to_do=512) at fileops.c:494 #4 0x00007fffff0a947d in _IO_new_file_xsputn (f=0x7fffff3f5620 <_IO_2_1_stdout_>, data=<optimised out>, n=2) at fileops.c:1331 #5 0x00007fffff07d92d in _IO_vfprintf_internal (s=0x7fffff3f5620 <_IO_2_1_stdout_>, format=<optimised out>, ap=ap@entry=0x7ffffffedf08) at vfprintf.c:1663 #6 0x00007fffff085899 in __printf (format=<optimised out>) at printf.c:33 #7 0x000000000040071b in print_list (list=0x602010) at corrupted_linked_list.c:50 #8 0x0000000000400628 in main () at corrupted_linked_list.c:17
Program terminated with signal SIGSEGV, Segmentation fault. #0 0x000055be9593e283 in print_list (list=0x55be96c20260, length=7) at broken_linked_list.c:51 51 printf("%d->", curr->data);
define p_generic_list set var $n = $arg0 while $n print *($n) set var $n = $n->next end end
document p_generic_list p_generic_list LIST_HEAD_POINTER Print all the fields of the nodes in the linked list pointed to by LIST_HEAD_POINTER. Assumes there is a next field in the struct. end
define indentby printf "\n" set $i_$arg0 = $arg0 while $i_$arg0 > 10 set $i_$arg0 = $i_$arg0 - 1 printf "%c", ' ' end end
//This program calculates and prints out the factorials of 5 and 17
#include <stdio.h> #include <stdlib.h>
int factorial(int n);
int main(void) { int n = 5; int f = factorial(n); printf("The factorial of %d is %d.\n", n, f); n = 17; f = factorial(n); printf("The factorial of %d is %d.\n", n, f);
return 0; } //A factorial is calculated by n! = n * (n - 1) * (n - 2) * ... * 1 //E.g. 5! = 5 * 4 * 3 * 2 * 1 = 120 int factorial(int n) { int f = 1; int i = 1; while (i <= n) { f = f * i; i++; } return f; }
(gdb) br factorial Breakpoint 1 at 0x11a5: file factorial.c, line 24. (gdb) r Starting program: ~/factorial Breakpoint 1, factorial (n=5) at factorial.c:24 24 int f = 1; (gdb) c Continuing. The factorial of 5 is 120. Breakpoint 1, factorial (n=17) at factorial.c:24 24 int f = 1;
接下來設定watch和display,我們希望i初始化之後再設定watch和display,
1 2 3 4
(gdb) n 25 int i = 1; (gdb) n 26 while (i <= n) {
然後設定watch和display
1 2 3 4
(gdb) watch f Hardware watchpoint 2: f (gdb) display i 1: i = 1
//This program calculates and prints out the factorials of 5 and 17
#include<stdio.h> #include<stdlib.h>
intfactorial(int n);
intmain(void) { int n = 5; int f = factorial(n); printf("The factorial of %d is %d.\n", n, f); n = 17; f = factorial(n); printf("The factorial of %d is %d.\n", n, f);
return0; } //A factorial is calculated by n! = n * (n - 1) * (n - 2) * ... * 1 //E.g. 5! = 5 * 4 * 3 * 2 * 1 = 120 intfactorial(int n) { int f = 1; int i = 1; while (i <= n) { f = f * i; i++; } return f; }
 {: w=”700” h=”200” }